


How I built the $3500 dining table of my dreams for less than $500

Has anyone else had this beautiful dining table following them around the internet in ads 🙋🏻♀️
I love its playful, oversized take on the classic turned legs of antique furniture, but it’s just not in my budget to spend thousands of dollars on any one object (except for maybe a custom Interior Define sectional 🙈).
For much of my furniture, I thrift vintage or antique or scrounge up something for cheap on Facebook Marketplace. But it’s hard to find a good-looking table that seats 8 comfortably, and I’d have to hire movers to haul it for me anyhow.
Plus, I’ve been itching to try my hand at woodworking for a while now, and the Spring 2022 One Room Challenge seemed like a perfect time to challenge myself.

When I found these turned legs for sale, I knew it was a done deal… I was going to build a dupe*!
*Let me preface this by saying I have some qualms about dupes. If it’s from a massive ecommerce giant that grossly overcharges for low-quality furniture, own it! However, in my case, I built a dupe of a very high-quality piece of furniture created by a reputable business employing hundreds of craftsmen, James+James.
So here is my caveat: If I had the budget to buy the James+James Olivia table, I would! Make no mistake—my dupe is lower quality than what they produce. I used a soft wood, #2 pine; they use a hardwood, knotty alder. My tabletop isn’t perfectly flat; theirs is pristine. Etc etc.
That being said, I’m pretty dang proud of what I made, and for my purposes, taste, and budget, it’s exactly what I needed. And it all started with good ol’ inexpensive #2 pine.
As any woodworker will tell you, the quality of your boards makes all the difference! When you go shopping, check for straightness and flatness and avoid boards with deep knots or holes. If you buy from a big box store like I did, your boards will come with beveled edges, so you’ll need to shave them off or you’ll end up with divots between every board when you laminate the tabletop.

I started by shaving the beveled edges off all of my boards (6 2x8x8 and 5 2x4x8) with my table saw.
This provides a nice crisp edge to laminate boards together flush.
Then, I marked my boards every 6 inches and used a biscuit joiner to cut slots for biscuits that would Tetris the tabletop boards together and prevent buckling as they set up in wood glue and heavy-duty clamps.

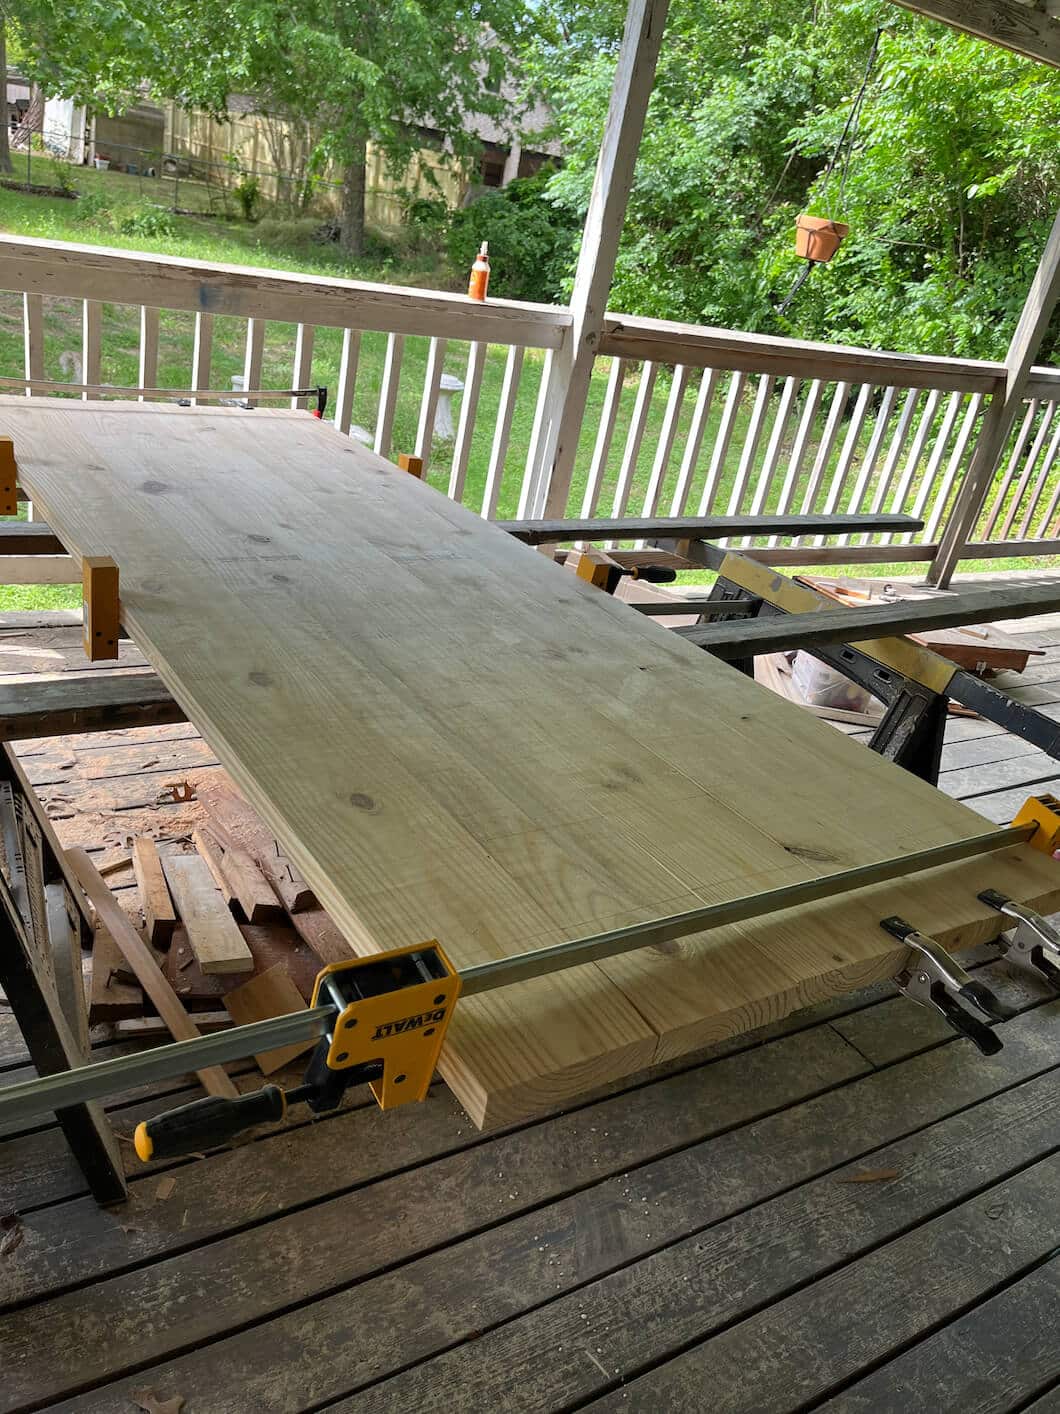
PSA: If your wood joints will ever be under tension (like a tabletop or a bench), you need to clamp for 24 hours, not just the amount of time it takes your glue to set!
I ended up joining 5 of the 2x8x8s and 1 of the 2x4x8s to get a total width of ~37 inches, exactly the width of the James+James table.
After 24 hours, I used a circular saw to rip cut the ends of the boards to get them flush. You can see in the clamp image above that one of my boards warped out at the end despite heavy clamping, so I trimmed more off that side. Ultimately I ended up getting a tabletop length of about 7.5 feet—plenty for 8 people.
I could give you a full breakdown of how to build the base and attach the tabletop, but instead, let me direct you to the main resources I used for this build with step-by-step instructions:
- Woodshop Diaries’ DIY Farmhouse Dining Table for building the base. I deviated from her directions in a few ways:
- She set her apron pieces back 1.5″ from the back of the table legs (using a scrap 2×4 spacer). I set my pieces back only 1/4″ to match the look of the James+James table.
- I did not cut a dado in my apron boards.
- I rocked my orbital sander back and forth along the tabletop edges to round them and make them less severe/pointy.
- The Handyman’s Daughter’s How to Install Figure 8 Table Top Fasteners. I’m hoping this method will allow for natural wood movement without causing splitting 🤞🏼


In the images above, you can see that I installed the apron pieces only 1/4″ back from the front of the table legs. The second image shows the table with added supports and wood conditioner applied.
Which leads me to the importance of wood conditioner for staining porous soft woods!

Wood conditioner helps fill the pores of the wood before stain to prevent blotchiness.
See the unconditioned board on the bottom? Blotchy.
After applying wood conditioner, I stained the base with Varathane gel stain in Kona, a dark rich brown. This stuff is SO satisfying—it only takes one coat to provide deep rich color.

For the apron, I sanded the pieces too finely and the gel stain had a hard time sticking, so I had to apply two coats. You can see in the image above how the legs are darker than the apron. Learn from my mistakes and stop sanding at 120-180 grit for pine if you use a gel or oil-based stain. Fortunately, I learned this before I sanded the tabletop!


Which leads me back to the tabletop! After I removed the clamps, it was clear that there were a few high points and ridges along the joints. I used a hand planer to shave them off before sanding the whole surface with rough 80 grit.
Then I went through several rounds of applying wood filler to gaps, cracks, divots, and knots and then sanding again. I finished with 120 grit. It won’t feel that smooth, but don’t worry! When you apply the poly and sand between coats with 220 grit or higher, you’ll still end up with a super smooth tabletop.

Here are the base and tabletop after stain!
Rather than assemble them outside and bring in the whole heavy table at once, it’s much easier to move the base to its final place inside, then add and secure the tabletop, and finally seal the table.
I even laid out my rug that will go under the table first because I knew it would be a nightmare to try to get it under the heavy table once it was in place. Then, I just laid some protective plastic over the rug before setting down the table. Once you’re done sealing, simply remove the plastic and it’s ready to go!

If you’re into this aged, chalky-looking “unfinished” finish, you could seal with a matte polycrylic.
Last, I sealed the table! From the James+James site, I knew that they used an oil-based polyurethane to add warmth to their tables and provide extra durability. I didn’t want the smell of oil-based poly in my house, so I went with a compromise: oil-modified water-based polyurethane.
Because it’s still water-based, it cleans up easily and is very low odor. To match the inspiration table, I used a satin finish.

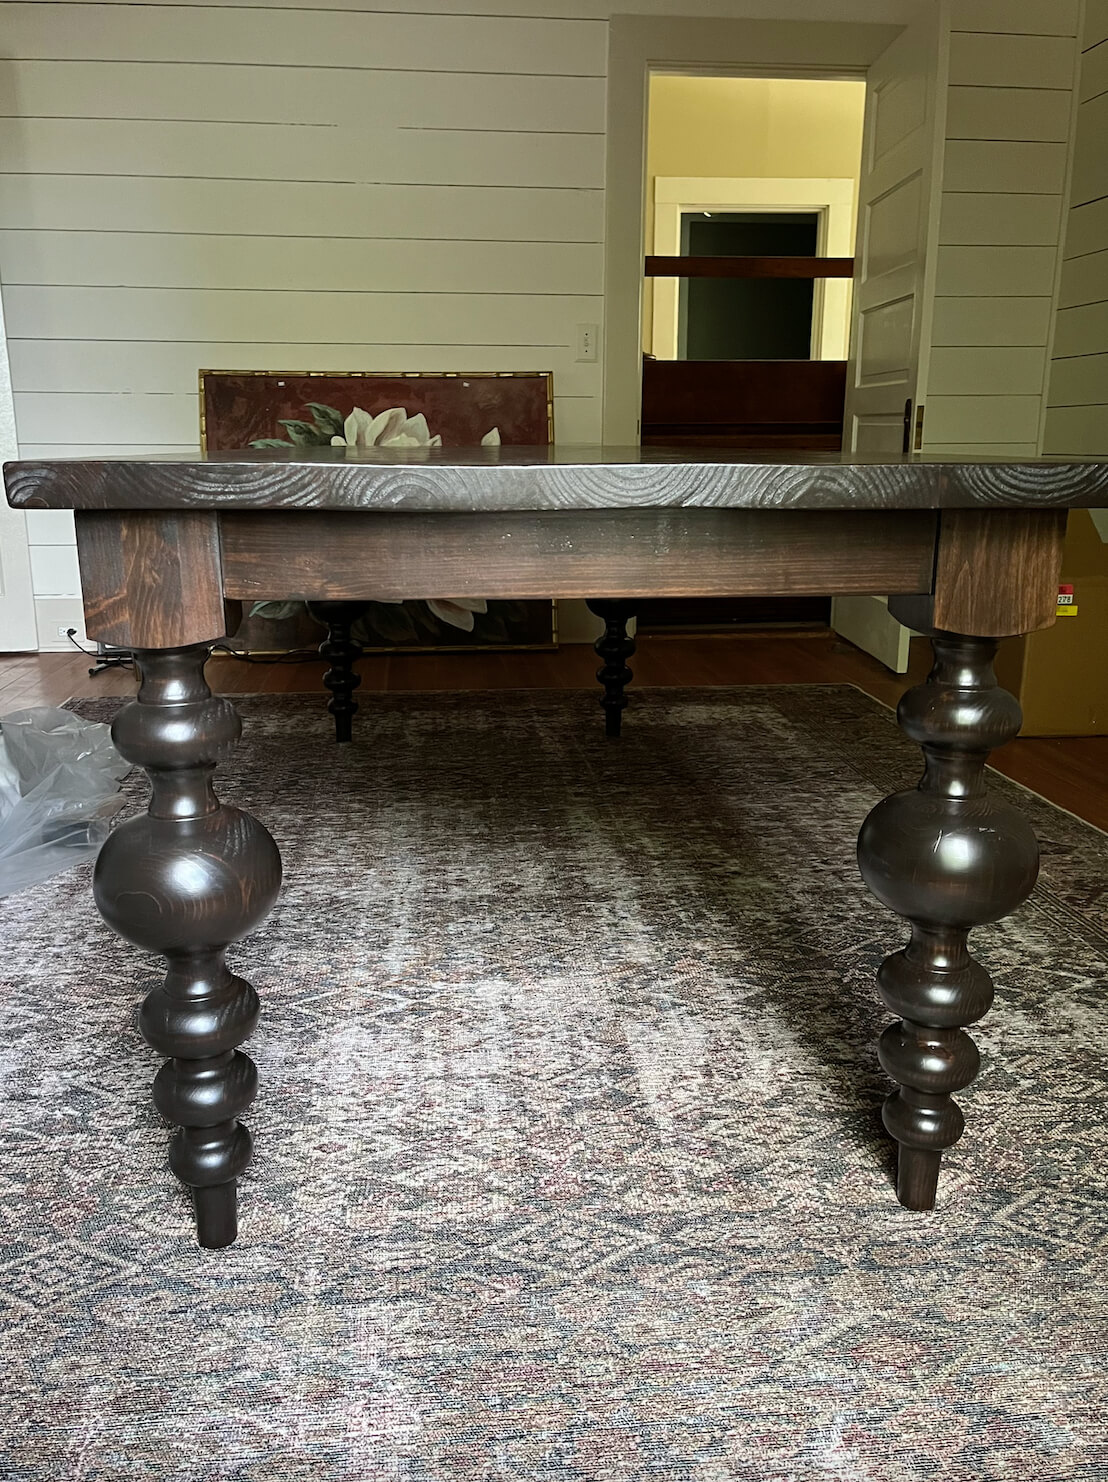
And here is how my dining table turned out! Almost an exact replica of the inspiration table, if I do say so myself. It’s super sturdy and beautiful and fits this space perfectly. I couldn’t be happier.
Legs cost: $275
Lumber cost: ~$100
Fasteners: $30
Total cost: ~$400!
Of course, this project does require a lot of tools, including ones I had to buy new like the biscuit joiner and Kreg pocket hole jig. That being said, I do plan to use these tools for many more projects for years to come, so it’s well worth it to me!

beautiful! strong work! I am trying to find the legs in counter height. Do you know a site that I can find them?
Unfortunately no, I’m only aware of these legs made for table height!
I have dreamt of these legs after seeing them online. I just had them delivered and can’t wait to begin. You did a beautiful job!!!
Yay! I hope your project turned out well 😊