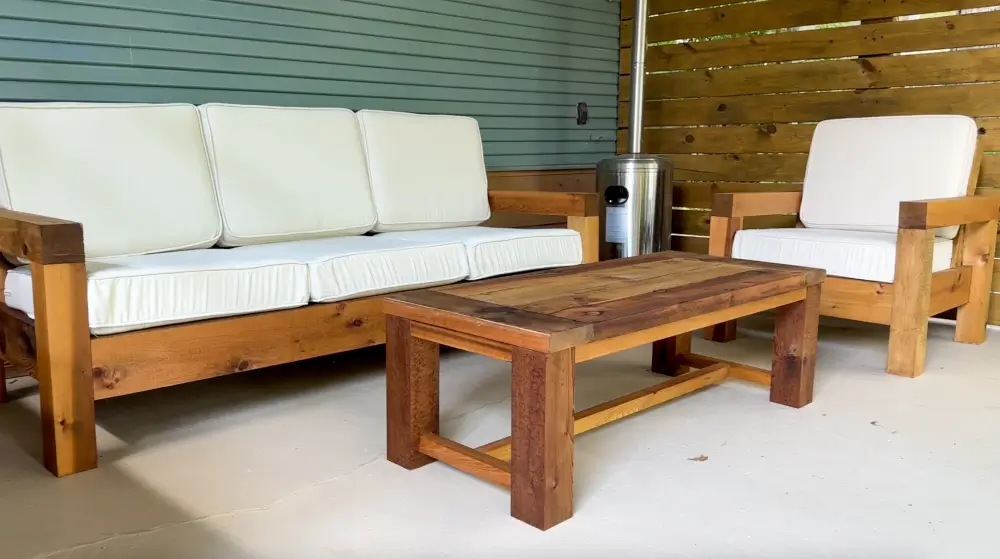

My parents needed furniture for their back porch, but patio sets can be SO expensive and usually aren’t the best quality. Even when you look at solid wood outdoor furniture, companies often use lower quality wood, fasteners, and cushions. I don’t know about you, but if I’m going to drop $1,000+ on furniture, it had better last a lifetime!
If there’s one thing that DIY renovating my house has taught me, it’s that almost anything is possible to DIY as long as you have instructions to follow. So after a few internet searches, I found some free plans online for a three-piece cedar patio set and got to work. Scroll to the end to see how much money I saved by building this set myself!

Project supply list
This post may include affiliate links, which means I may earn a small commission if you click on the link and/or purchase from that site. I use that money to keep this blog running. You can read my full disclosure policy here.
- Sofa plans
- Chair plans
- Table plans
- Thickness planer
- Pocket hole jig
- Drill
- Driver
- Waterproof wood glue
- Miter saw
- Table saw
- Circular saw
- Orbital sander
- Stain
- Cushions
Step 1: Plane cedar, if needed
The plans for the sofa, chair, and table will each tell you how many pieces of cedar of which dimensions you’ll need for each project. You can also use pressure-treated pine, which is less expensive than cedar but also won’t be as durable, long-lasting, or attractive. It will be less attractive because the lumber is treated with copper and will have a blue-green hue that peeks through your stain unless you plan to use a solid wood stain or paint.


I bought my cedar at the hardware store and had a lot of trouble finding quality 2×6 smooth cedar anywhere. So I opted for 2×6 rough cedar and planed it smooth with my thickness planer. This is definitely a tedious process—especially on a 4×4 where you have to plane all four sides—so I’d recommend using smooth cedar if you’re able to find it.


Before you run your lumber through the planer, be sure to remove any staples from the ends of the boards. I like to use needle nose pliers for this. To pick up all of the staples later, you can tie a magnet to a string in a pinch, or invest in a magnetic sweeper.
Step 2: Cut your cedar to size


The instructions for each piece of the set will specify the lengths you need to cut each of the boards into for the various furniture components. I find that a miter saw is easiest for this. Be sure to cut on the outside of your pencil mark so that you don’t shave off too much length.


The coffee table plans also call for a 2×2. I’ve found that it can be hard to find cedar 2x2s in the store, and even if you do, 2×2 soft woods like cedar bend and warp very easily. Instead, I ripped down a 2×4 to size. To do this, start by setting your table saw to 3.25″ and run the board through. This will remove the rounded edge on the 2×4. Then, set your table saw to 1.5″ and run the board back through with the newly flat edge against the fence. This will create a 2×2 that is perfectly square on all sides.
Step 3: Assemble the sofa and chair
You’ll find as you follow the instructions for the sofa and chair that they are pretty much the same construction but the sofa is just longer. I’m the kind of person who likes to do the hardest project first to get it over with, so I built the sofa first. After that, building the chair was a breeze.
The instructions in the plans are pretty detailed and helpful, BUT there were a few mistakes! So I highly suggest you follow the corrections below to make sure you don’t end up hacking apart your poorly assembled chair legs like I had to.
Don’t make these mistakes in the plans:

For the legs, the plans specify to bore a 1″ deep hole into the 4×4 and fasten it to the 4×4 below with 3″ screws. However, if you do the math, that means that only 1/2″ of the screw will be fastened into the 4×4 below, which is not nearly enough to make a secure connection. Instead, use 4″ screws.


When you get to installing the seat slats, you’ll notice that the number of slats outlined in the instructions isn’t enough and there will be a gap remaining at the back of the seat. Fortunately, I had a leftover 5/4″ board that I was able to rip down on my table saw to fill these gaps, but plan on having to add that extra slat.
Other recommendations:
Now these aren’t problems with the plans per se, but here are some suggestions I have for you if you plan to build this set.

Clamps are 100% your friend for this project. I have a set of 48″ bar clamps from building my dining table, and I know they’re an investment, but I wouldn’t have been able to do this project alone without them. Otherwise, you’ll need a helper to hold pieces up and in alignment while you work, and even then it may not be as perfect as using clamps.

Use a rubber mallet to make adjustments to the angle of the seat back. This is one of the trickiest parts of the construction if you’re building it solo because it would really be easiest with multiple sets of hands. But if you have clamps providing tension and then make minor adjustments with your mallet, you can get the correct distance and angle specified in the plans without a helper.

Use a miter protractor to measure the angle for your seat back. This is just a handy tool to have in your toolkit, especially if you plan to tackle any trim projects. But it’s super helpful in this case to quickly and easily detect the angles you need to achieve.
Step 4: Assemble the table
The table assembly instructions are pretty thorough, but I did find one big issue…
Avoid this mistake in the plans:


It can be extremely difficult to laminate a tabletop and have all of the board ends stay perfectly flush. So what you’ll usually end up doing is cutting them flush with a circular saw on both sides. This will naturally shorten the length of your tabletop by at least 1/4″. I found that after I did this, the tabletop became too short for the base and I had to add on some extra side pieces to even things out. To avoid this problem, cut the 37.5″ pieces of the tabletop long—about 38″ or longer. That will give you plenty of room to cut them flush later without shortening the tabletop.
Other recommendations:


For tabletops, I always suggest using figure-8 fasteners to attach your tabletop to the base. Wood will naturally expand and contract in different temperatures and humidity, and this will especially be an issue outside. If you just screw your tabletop directly into the base, you fix it in place, so the wood is more likely to split or crack as it expands and contracts. Figure-8 fasteners move slightly to allow for this wood movement without splitting the tabletop.


Laminating tabletops doesn’t always go perfectly. If you find that your finished tabletop has some gaps or cracks, add some waterproof wood glue to the spot, then press some sawdust down into it, let the glue dry a bit until tacky, and then sand over it. The sanding will create even more sawdust that will mix with the wood glue and fill the crack without anyone being the wiser. I suggest opting for more sawdust than wood glue in this mixture because wood glue can sometimes block stain from penetrating and keep the spot always looking like raw wood.

Use a pocket hole clamp to keep your wood joint in place as you drive in pocket hole screws. Sometimes the force of the drive can shift your wood and ruin the joint you make. Using this specific kind of clamp helps to keep that joint perfect while you work.
Step 5: Stain your furniture

Before staining any wood, I always suggest that you water pop before the final sand to raise the grain. What this means is that you just need to rub down the wood with a wet rag and then let it completely dry. You’ll notice that this will turn your smooth surface back into a rough surface.

You can then do your final sand and apply stain. If you skip water popping, you may find that your stain is what lifts the grain and you’ll end up with a rough finished piece.


For outdoor furniture, I like to use a durable penetrating oil stain/sealant combo. And for cedar, I like to use one part Pecan and one part Mission Brown, which together give a true cedar color without looking too orange. I find it easiest to apply stain with a brush between the slats and with a staining sponge everywhere else.
Step 6: Add cushions

One of the great things about these plans is that they’re made for standard 24″ outdoor cushions that you can buy anywhere. I did a lot of research on the best cushions to buy, and there were a lot of mixed results. Some of the more affordable options had poor ratings for either the fabric or the foam insert. Even some options with high quality Sunbrella fabric still had poor ratings for the inserts.
But I finally found my Goldilocks cushion: highly rated fabric and foam at a reasonable price. The shade Sand Cream is light and fresh without being so white that it will show every single speck of dirt.

I’m so happy with how this cedar patio set turned out! It’s super sturdy, made from high-quality materials, and should last for many decades to come.
So what was the total cost?
- 10 cedar 2x4s – $170
- 5 cedar 4x4s – $175
- 5 cedar 2x6s – $120
- 4 cedar 5/4x6s – $60
- Oak dowel 1” – $8
- Sales tax for lumber – $33
- Pocket hole screws – $22
- 2-1/2” deck screws – $11
- 4” deck screws – $12
- 4 cushions – $444
- (other materials and tools excluded if I already had them)
TOTAL COST – $1,055
That may sound like a lot, but consider that a comparable quality solid wood 2-piece patio set with just a sofa and coffee table costs $1,879. And with a quick internet search, I actually haven’t been able to find a single 3-piece patio set of comparable size and quality to this one. But if I could, I’d imagine it would be north of $2,500.
Also, notice that half of my build budget went to the high-quality cushions, which is what many manufacturers will skimp on to save on costs.
So all in all… I definitely think it was worth it to DIY!

For another great cedar build, head to DIY Ergonomic Cedar Rocking Chairs. Want to learn the more basic skills of woodworking? Check out my course DIY Renovation for Beginners, where I have full modules dedicated to how to use power tools and get started with woodworking.
