
So how much does it really cost to build a wall of IKEA built-ins? And more importantly, is it worth it? I’ve broken down the process step by step for you, including individual costs and my thoughts on what I would and definitely would NOT do again. So without further ado… let’s get into it!
Project supply list
This post may include affiliate links, which means I may earn a small commission if you click on the link and/or purchase from that site. I use that money to keep this blog running. You can read my full disclosure policy here.
- BILLY bookcases
- PAX wardrobes
- Drill
- Driver
- Brad nailer
- Underlayment plywood
- 3/4″ birch plywood (optional, for custom cabinets)
- 3/8″ wood screws (optional, for custom cabinets)
- 1/8″ hardboard
- 3/4″-thick poplar
- Outlet extenders
- Bondo
- Spackle
- Caulk
- Zinsser B-I-N primer
- 320-grit or similar sandpaper
- Tack cloths
- Furniture-grade enamel paint
- Floetrol
Step 1: Build a platform

If you want your built-ins to look truly “built in” to your space, they need to share the same bottom trim and top trim as the rest of the room. That includes baseboards. You will need to build a platform to boost the bottom of your cabinets to the top of your baseboard height so that you can add baseboard to the built-ins and make them look seamless.


Keep in mind that if you are using IKEA cabinets, they have a toe-kick at the bottom, which is like a mini platform. You will need to subtract the height of the toe-kick from the height of your baseboard to find how tall you should build your platform. Keep in mind that the toe-kick height is not the same for every IKEA product. For example, I used BILLY bookcases and PAX wardrobes, and the PAX toe-kick height is slightly shorter. So when I built my platform, I built it at two different heights to accommodate the two different products and make sure they ended up at the same baseboard height.


For my platform, I used 3/4″ plywood scrap that I had left over from other projects, so this was free for me. But if you don’t have that laying around, you can go to the hardware store and buy the cheap ugly underlayment plywood—no need to buy anything cabinet-grade. No one will see the platform once you have everything trimmed out.

Most people will remove the baseboard before installing their platform against the wall, but this house has 100-year-old baseboard that doesn’t remove without breaking and splintering, so I decided to fix my platforms to the existing baseboards with screws and build around them.
The most important part of this step is to ensure your platform is completely level—front and back. You can use wood shims to get your platform dead level. If your cabinets aren’t level, the doors won’t line up correctly, and it will be a nightmare (don’t ask me how I know 🙃).
Cost for me: $0
Step 2: Assemble and install IKEA cabinets


For my bookshelves, I chose two large BILLY bookcases, each with three height extension units to bring them closer to the ceiling, for a total of six extension units.


For my closet units, I chose one tall wide PAX unit, two tall narrow PAX units, four tall GRIMO doors, and two short GRIMO doors that I repurposed for the custom top cabinets I built. I also purchased three additional sets of the KOMPLEMENT self-closing hinges.

To secure your cabinets, make sure that each cabinet is screwed into the adjacent cabinet as well as anchored to the back wall. Side units should also be anchored to the side wall. Some IKEA components come with hardware to attach adjacent products to each other. So BILLY can connect to BILLY, and PAX to PAX, but to connect the two different products together, I just pre-drilled countersunk holes, used wood screws, and filled the holes with spackle.
Cost for me: $1,566.38
Step 3: Build and install custom cabinets (optional)

If you have normal-height ceilings, you likely won’t need this step. PAX wardrobe heights in particular are designed to get close to the most common ceiling heights so that you won’t need to fill much blank space. But in my parents’ 1915 home, the ceilings are almost 12 feet tall, so I needed to fill the space.


I used 3/4″ sanded plywood for the tops, bottoms, and sides and 1/8″ hardboard for the backs of my cabinets. I connected the 3/4″ plywood with pocket holes and then pre-drilled countersunk holes on the back hardboard for 3/8″ wood screws. Countersinking your screws here is important so that the back of your cabinet can sit flush with the wall. You could also use plywood on the backs, but I chose hardboard to make these a bit easier to lift.

To make things aesthetically pleasing at the end, I built the cabinets up only to the tops of the bookcase extension units so that everything would look even and level. I also repurposed two GRIMO doors and turned them into four short doors for the top cabinets that perfectly match the GRIMO doors on the PAX units below.

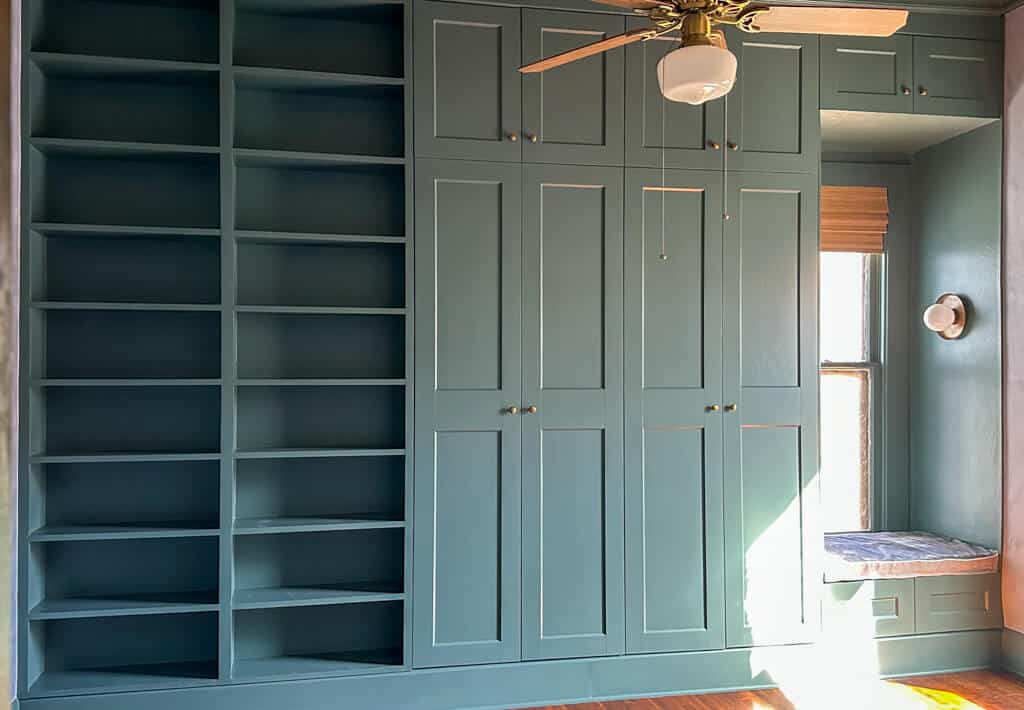
Finally, I built cabinets to extend above and below the window in the corner. The fronts are designed to look like the fronts of the PAX wardrobes, but the top cabinet door actually lifts up for easier access with a lid stay, and the bottom cabinet is secretly a storage chest that also functions as a reading nook.
Cost for me: $248.50
Step 4: Trim out your built-ins


Keep in mind that if you use BILLY bookcases, the shelves are not as deep as the sides of the bookcases. This means that if you add face frame trim to the fronts of the bookcases, there will be ~1/8″ gap between the trim and the shelves. To get around this, I made some 1/8″-thick pieces of wood on my table saw and attached them to the fronts of the shelves before I added my 3/4″-thick poplar face frame trim.

The face frame trim is optional, but this is what will take your bookcases from an obvious IKEA furniture piece to a custom built-in look.


Another issue I ran across with both the BILLY and PAX units is that the backs are just folded sheets of hardboard. If you don’t mind the creases of the folded hardboard, no problem. But if it bothers you like it bothers me, I suggest cutting and using your own 1/8″ sheets of hardboard on the backs or even 1/4″ plywood for extra sturdiness. If you forget to do this during assembly, you can fix it later like I did by cutting 1/8″ hardboard to the size of each section of shelf and gluing it to the back with spray adhesive. Not ideal, but it will work and look seamless after caulking.
For all of these reasons, if I were to do this project over again, I would not buy BILLY bookcases but instead try to build my own from scratch with plywood. But if you don’t feel comfortable with building furniture from scratch, you can still make these pre-built bookcases work for you.
Keep in mind when you’re placing your cabinets that if you want them to look flush in the end, you will need to set the fronts of the bookcases to be flush with the fronts of the PAX wardrobes BEFORE face trim on the bookcases and doors on the wardrobes. That way, when you add the 3/4″-thick face frames to the bookcases, they will be flush with the wardrobes and their 3/4″-thick doors.


This is also the point where you’ll add on your bottom trim like baseboards and shoe moulding and your top trim like crown moulding.

If you’re like me and still have a gap from the top of the cabinets to the ceiling, I laid a 2×4 with the wider side tall on top of the cabinets, made it flush with the front of the cabinets without the doors or face frames, and then attached it with wood glue and brad nails shot in from the tops of the cabinets below. Setting it back behind the doors and face frames will allow the plywood piece to be flush with their fronts.


Then I nailed a 3/4″-thick piece of plywood to the front of the 2×4 that extends almost all the way to the ceiling. It doesn’t need to hit the ceiling if you will have crown moulding to bridge the gap. I also used my router to add a chamfered edge to the side of the plywood that would abut the tops of the cabinets and bookcases. That is because I wasn’t sure if all of my wardrobe doors would be perfectly even, and the chamfered edge disguises the unevenness better than a straight edge would have.
Later once I finished the ceiling, I also added on the crown moulding to complete the built-ins trim and make them completely seamless with the room.
Cost for me: ~$200
Step 5: Fill, caulk, prime & paint

The prep work for paint is the most important part of painting, but unfortunately it’s also the most tedious and annoying (in my opinion). I used extra-hard Bondo to fill every front seam of the book case between the shelf, 1/8″-thick wood filler piece, and face frame to make it seamless as well as every joint on the face frames.


For screw holes and the shelf peg holes in the bookcases, I just used simple spackle. I then sanded everything smooth and caulked all of the joints around the bookshelves and between trim pieces. This is what makes everything look seamless when you paint it.

If you are painting IKEA furniture, meet your new best friend: Zinsser B-I-N primer. This is a shellac-based primer that sticks to anything and dries quickly, but be aware that it’s very runny and very stinky. Try to ventilate the room you’re working in, if possible, or wear a respirator when applying it. You will need two thin coats, sanding lightly with 320-grit or similar sandpaper in between to remove gritty bumps and texture. Use tack cloths to remove sanding dust before you apply a new coat.

For your paint, I suggest using a furniture-grade enamel. I used a BEHR paint for my built-ins because they could color-match the Farrow & Ball paint that I wanted, but my typical go-to is Benjamin Moore Advance, and I wish I could have used it here, too. It has a longer dry time, which means you can work with it longer before it starts drying and getting streaky. But to help extend the working time of any paint, I suggest mixing in Floetrol.

For paint, you will also need at least two coats, sanding lightly in between with 320-grit or similar sandpaper to remove roughness and ensure a smooth finish.
Cost for me: ~$200
Step 6: Add hardware

Now that your paint job is complete, you can add on your final hardware and call it a day! A few years ago, I bought a few dozen solid brass knobs (similar) on clearance, and I’m still finding ways to use them to this day. They were perfect for the fronts of my cabinets, but I put them in my crockpot for a few days first to soften and remove the lacquer so that they can age naturally.


I also stripped the lacquer off my solid brass hinges for the reading nook chest and then I found a great antique brass ring pull for the lid that is virtually undetectable beneath the cushion when lying flat.
Cost for me: ~$50

Total built-ins cost: $2,264.88
I hope this guide was helpful to you! I do plan to renovate another bedroom in my parents’ house with floor-to-ceiling built-ins, and in there I will attempt to build the bookcases myself. So I’ll be back after that with another post sharing the pros and cons of each option as well as the price difference.

PS: If you want to learn how to use power tools and gain the skills to build your own cabinets, check out my course DIY Renovation for Beginners.

What Farrow and ball paint did you get your inspiration from? I love your color.
Thank you! It’s Inchyra Blue by Farrow & Ball
Love it! I’m planning on building something similar from scratch for our dining room this Spring. Can we get a closer look at the storage unit/reading nook? Your solution looks much elegant than mine, but I can’t fully visualize it.
Hi, I’m planning on something similar for a wall in my office. Thinking about using this color or a similar one. What sheen did you use for your paint? Did you use enamel paint for the ikea stuff & trim and then a different type for the ceiling and wall?
Love the ceiling wood paneling do you have tutorial for it? What material was used and the cost?