
Little free libraries are a great way to promote literacy and a love for reading in your community. They’re also a fun way to exchange books with neighbors and see what they’re reading! You can make a little library out of anything—from mini fridges to kitchen cabinets—but they won’t necessarily hold up well outside in the elements.
If you want a beautiful, water-tight little library that will stand the test of time, this DIY build is made with exterior-friendly materials. Plus, with these plans you don’t have to commit to anchoring your library in one spot in your yard. Because the post is anchored in a planter rather than the ground, you can move the library wherever you like in case your landscaping plans change down the line.

Project supply list
This post may include affiliate links, which means I may earn a small commission if you click on the link and/or purchase from that site. I use that money to keep this blog running. You can read my full disclosure policy here.
- Lumber and trim
- 3 of 2×4 sheets of 1/2″ pressure-treated plywood
- 1 of 2x2x8 – cedar or pressure-treated pine
- 1 of 1x4x8 board – cedar or pressure-treated pine
- 1 of 4x4x8 post – cedar or pressure-treated pine
- 5-pack of 24″ scallop trim
- 4 packs of cedar shims
- Ridge cap trim
- Fasteners
- Hardware
- Materials
- Waterproof wood glue
- Construction adhesive
- Caulk
- Baby wipes or Crocodile Cloth
- Spackle
- 180-grit sanding block
- Oil-based primer
- Exterior paint
- Exterior wood stain
- Light brown spray paint
- Antique walnut gel stain
- Matte enamel spray paint
- 28×30 polycarbonate sheet
- 20×20 double-walled planter box
- 1 bag of fast-setting concrete mix
- Bondo
- CopperCoat
- Potting mix
- Flowers
- Tools
Step 1: Cut out plywood and trim


Follow the free plans HERE for the measurements for your plywood cutouts.
Use a table saw, circular saw, or jig saw to make your plywood cutouts. You will also need a 12″-long 2×2. You can either buy a 2×2 or rip one down from scrap 2x material on your table saw. Then, cut to 12″ long with your miter saw.

Take your 1x4x8 and first rip it down on your table saw to a 1x2x8 strip, and set it aside for your door pieces. Take the remaining board and rip down one strip of trim to the thickness of your plywood. For me, that was slightly less than 1/2″ thick. To get this measurement perfect, use a scrap piece of the plywood to set the fence on your table saw. Set this ~1/2″ thick trim aside for the front of the library. Finally, rip the remaining board into 1/4″ thick strips for the rest of the trim.

To get the roof pieces to rest perfectly on top of the library walls, it’s important to get the angles of the front and back pieces the same. I suggest laying them on top of each other, clamping them down with spring clamps, and making the cuts at the same time to ensure that they match.
Once you lay the front piece over the back and clamp them together, measure 8 inches down on each side of the front piece and make a mark. Then, mark the center of the top of the front piece. Take a straight edge and draw lines from the center top mark to the side marks to create the triangle cut for the roof. Refer to page 1 of plans for a visual. Then, cut along these lines with a circular saw or jig saw.

Now that your pieces are cut, take your two base pieces and apply waterproof wood glue between them, sandwich them together, and weigh them down with heavy objects on a flat surface to dry. This will create a sturdy ~1 inch thick base to attach to your post down the line.
Once your base is laminated, it’s time to prime everything. I like to use an oil-based primer for exterior projects like this for added weatherproofing. Prime all sides, including the edges. If you forget to laminate your base before priming, you can still attach the pieces together, but you will need to use construction adhesive instead of wood glue.
I also like to paint my pieces before assembly so that I just have to do touch-up paint down the road. Be sure to use an exterior paint for this so that the color will hold up outdoors.
Step 2: Assembly


Once the paint is dry, it’s time to start assembly. Lay your back wall down, and the side walls will sit on top of its edges. I used construction adhesive on the edges in combination with 1″ brad nails to secure the pieces together while the adhesive dries. If you didn’t prime or paint before assembly, you could use waterproof wood glue and brad nails instead.

Then, apply construction adhesive to the edges of your front piece and lay it on top of the side walls. Align the start of the triangle edge on the front piece with the outside edge of the side wall (see photos below). If you get confused, just take a look at how the back and side walls connect. You’ll see that the slope of the triangle starts right at the outside edge of the side wall. That’s what you want on the front as well. Use two brad nails per side to fix the front piece in place.


Cut your 2×2 to 12″ long and wedge it between the top of the front and back pieces with its edges lining up with the top corner of the roofline. This will be your roof support. Pin it in place with one brad nail each in the front and back. Then, pre-drill one hole on each side for a 1-1/2″ deck screw, and fasten the screws. I suggest counter-sinking your screws beneath the surface of the plywood so that you can spackle over them and disguise the screws later.


Take the shorter roof panel and lay it on one side of the roof with its longest side running from front to back, not up and down. Align its top with the top of the 2×2. Use a measuring tape to make sure that the overhang is the same on the front and back of the roof. Pin the panel in place with a couple brad nails shot into the 2×2. Then, pre-drill and fasten in three 1-1/2″ deck screws directly into the 2×2 roof support.

Move to the other side and lay your longer roofing panel on top. The top of this panel should align with the top edge of the shorter roofing panel, as the arrow shows above. This slight overlap is why this panel is cut longer. Like before, pin it in place with brad nails and then pre-drill and fasten three 1-1/2″ deck screws into the 2×2 roof support.


I like to caulk the screw holes and the seams between the two roof panels for extra waterproofing. This is also a good time to caulk all of the seams between your various panel pieces. This will create a nicer looking finished product and will also help prevent water penetration during storms.


Take your ~1/2″ thick trim piece and cut it to the length of the drop from the bottom of the front piece to the bottom of the library. Align the side of this trim piece with the side of the front piece and secure to the side wall behind with five 1″ brad nails per side. Be careful to shoot these brads straight into the plywood; if you shoot at an angle, they may stick out of the plywood. Fill all of your nail holes with spackle if you plan to paint the trim or wood filler if you plan to stain.


Then, it’s time to create your cedar shingles roof. If you don’t want to go to the trouble of this fancy roof, you can leave the plywood roof as is or staple on asphalt roofing shingles. But the cedar is pretty fun.
Start with one side of your roof (either works) and coat it with construction adhesive. Then, take a pack of cedar shims and lay a single layer along the roof with the thicker side of the shim angled down. I had my shims overhang the roof by about 1/2″ on the bottom and sides, but you can choose more of an overhang if you prefer.
Then, add more layers of shims, moving upward. At this point, you can use waterproof wood glue in between since you are attaching raw wood to raw wood. I like to do four rows, leaving 2-3 inches between each row and staggering the shim ends slightly rather than keeping them perfectly aligned for a more rustic cottage-y look.

Allow the adhesive and wood glue to completely dry before trimming the shingles flush to the top of the roof with a jig saw. Set the jig saw to 0 on the orbital action settings to reduce splintering.
Now that the first side is trimmed, you can move on to adding the shingles to the second side. Repeat the same steps as above, finishing with trimming it flush to the top of the roof line.


While you’re waiting on roof glue to dry, you can start attaching the shelves. It’s easiest to do this if you can tilt the library back at an angle. The first shelf will be 4″ above the base. You don’t have to measure and mark for this if you’re using 4″ shelf brackets. Just align the bottom of the brackets with the bottom of the back wall, and your shelf will be level and perfectly spaced.
For the top shelf, choose a location that will allow you to fit the tallest books that you want to put in your library. In my case, the tallest book was 9.5″ tall, so I put the second shelf 10″ above the bottom shelf to allow for some wiggle room. I found it easiest to attach the first shelf bracket with the library laying down and then lift it up to attach the second bracket so that I could check the shelf for level.
The back brackets don’t provide enough support alone, so I then added some smaller front brackets to each shelf for extra support.

If you want to make the fronts of your plywood shelves look seamless, press spackle into all of the texture and gaps along the edges. Let the spackle dry, sand it smooth with a 180 grit sanding block or sandpaper, and then paint it for perfectly smooth shelf edges.


Finally, it’s time to attach your base. Apply construction adhesive to the side and back borders of the base top, and then lift and place your library down on the adhesive. Use a baby wipe or Crocodile Cloth to remove excess adhesive that may have squeezed out.
The adhesive will allow your library to come together enough to get it on the post. Later, we’ll add some extra security with screws. The construction adhesive may be enough—even in strong winds—but I prefer to over-engineer and would rather be safe than sorry.
Step 3: Decorative touches


For an extra fun detail, I added scallops to the front gable. The spacing just happened to work out perfectly for this scallop trim that I found. Cut the first row of trim with your miter saw to 9 scallops wide, and fasten it to the gable with construction adhesive. Both sides of the trim should touch the sides of the gable, and you can use a level to get it straight. I do suggest priming and painting this trim before you attach it to save yourself a big hassle later.
From there, each row above has one fewer scallop. So 8, 7, 6, 5, 4, 3, 2, and 1. Apply dots of construction adhesive to the top edge of the back of the trim, then align the trim edges with the sides of the gable again, and press down. Keeping the scallops touching the gable sides will provide perfect spacing every time. Not planned at all, but I love when that happens!


At this point, you can attach your final trim to the library to clean it up. I used 1/4″ thick trim on the sides and back of the base, but I used the ~1/2″ thick trim for the front so that it would be flush with the front trim pieces. I then cut 1/4″ trim to wrap around the corners of the library and hide the plywood seams.
For the trim pieces that go on the sides and dead-end into the underside of the roof, you can cut that end of the trim at a 45-degree angle to fit snug beneath the roof. Everywhere else, you can just cut the trim at 90-degree angles. In my experience, mitered corners don’t hold up well outside in the elements, so butt joints are perfectly fine here. You can always caulk the seams to disguise the joints.


The one exception I made for mitered angles was this front roofline trim that covers up the exposed plywood edges. This just looks so much prettier as a mitered joint. Cut your pieces at a 45-degree angle for the mitered side, and then cut them to the length of the roof plywood edge or a bit longer. Fasten them to the edges with 1″ brad nails. Spackle the nail holes if you plan to paint, or use wood filler or you plan to stain.
Now is also the time to fill any remaining nail holes, sand them, and caulk all of your seams.


At this point, you can do all of your painting and staining. I chose to stain the roof with a water-based stain/sealant combo, but in retrospect I’d suggest using a penetrating oil-based stain that will hold up better to the elements. I also painted the trim and then painted a fun mural inside. This is, of course, completely optional, but it’s fun for library visitors to see it peeking through when they grab a book. I’ve also stapled wallpaper inside a little library before to create this effect.


The final step here is the ridge cap for the roof. This polystyrene trim provides an extra layer of waterproofing and also just looks fancy. To make the polystyrene look like wood, coat it with a 2-in-1 light brown spray paint and then brush it with antique walnut gel stain to look like wood grain. After it dries, spray it with matte clear enamel spray paint to lock in the stain, apply construction adhesive to the inside, and press it firmly on the top of the roof to secure it.
Step 4: Build and install the door

To build the door frame, cut your 1×2 material into two 26″ pieces and two 13″ pieces. Use a pocket hole jig to drill two pocket holes on each side of the 13″ pieces only. NO holes are needed on the 26″ pieces. Clamp the 13″ pieces between the 26″ pieces to create a rectangle and fasten the corners together with 1-1/4″ pocket hole screws. You can choose to leave these pocket holes exposed, or if you want to disguise them, you can fill the holes with Bondo, let it dry, and sand it smooth. Then, prime and paint the door frame.

On the side of the frame where you made your pocket holes, add your hinges. This will be the inside of the door frame, so it will hide any marks left by the pocket holes. Use three hinges and install the top and bottom hinges 2″ away from the top and bottom, respectively. Center the remaining hinge. Pre-drill holes for your screws to prevent splitting the wood, and fasten the screws.


Then, cut your polycarbonate sheet to 25″x15″ on your table saw. Remove one side of the protective coating on the sheet, and place that side facing down on the door frame. Then, remove the remaining protective coating.
Use a #6 countersink drill bit set to just the depth of your 1/2″ screws to drill 4 holes per long side and 3 per short side. The countersink bit will allow you to remove some of the polycarbonate material above the hole and embed the head of your screw in its surface so that it’s flush. If you skip this step, your screws will stick out and may prevent your door from laying flat on your library.

To fasten the door to the library, align the outside edges of the other halves of the hinges with the outside edge of your library. Pre-drill holes for your screws to prevent splitting the wood, and fasten the hinges in place.


Along the other side of the door, measure and mark the center of the length and center of the width of that 1×2 piece. Drill a hole at that center point. Then, screw on your knob.


To keep your door from swinging around in the wind, you’ll need some sort of latch. I like to use magnetic latches for this. Screw in one side of the magnet beneath the knob screw on the inside of the door. Then, attach the other side of the magnet to it and place a double-sided adhesive strip that comes with the magnets on its back. Close the door and push firmly against the trim, and then open the door again. The adhesive should keep the second side of the magnet stuck against the trim in perfect position. Then, pre-drill and fasten its screws to keep it in place.
Step 5: Prep and anchor your post

Cut your 4×4 post to 26″ long and brush 10″ up from the bottom of the post with CopperCoat. This will increase the water resistance of your post and give it a longer life. This stuff is stinky, so I suggest you apply it outside. You will need to apply at least two coats, waiting an hour between coats.


Set your planter in your yard where you’d like to position your library. You can move it after this, but it will be much heavier, so it’s easiest to put it in its final placement now. Place the bottom of your post in the center of the planter, and use heavy clamps or a second set of hands to hold it in place as you pour in a bag of fast-setting concrete mix. With gloves on, level out the concrete mix and tamp it down around the post. Then, pour a gallon of water over it. The water will seep into the concrete mix—no mixing required!


While the concrete sets, drill holes right above the concrete on the inside of your planter all the way around. This will allow water to drain and escape into the double wall of the planter since water can’t drain through the concrete. Then, drill holes along the bottom outside edge of the planter. This will allow that water to drain from the planter and into the yard. This is also a good time to stain the exposed post, if you choose to do so.

Once the concrete sets, it’s time to install your library! Carefully carry your library outside and center it on top of the post. Check with your measuring tape to be sure it’s centered. This will be less stressful if you have a helper during this process to keep the library stable while you work, but I managed to do it solo.
Once you have the library centered on the post, secure them together with heavy duty brackets. On the front and back of the library you will need to flip the longer side of the bracket down because it won’t fit on the library base. On the sides, you can keep the shorter side of the bracket down. Use the provided screws, fastening the longer ones into the post and the shorter ones into the library base. It’s safer to pre-drill the holes for these screws because if your impact driver starts shaking to drive the screws in, it may make your library wobble as well.


Then, it’s time to attach the final screws that anchor the base to the sides of the library. Pre-drill holes for 1-1/2″ deck screws along the sides and back of the underside of the base, being sure to shoot up straight into the side walls. Do NOT drill along the front, as there is no plywood to screw into above. If you’re worried about accidentally drilling holes at an angle, you can use a drill block to keep the bit straight. Then, fasten in your screws. I used 3 on the sides and 4 along the back.
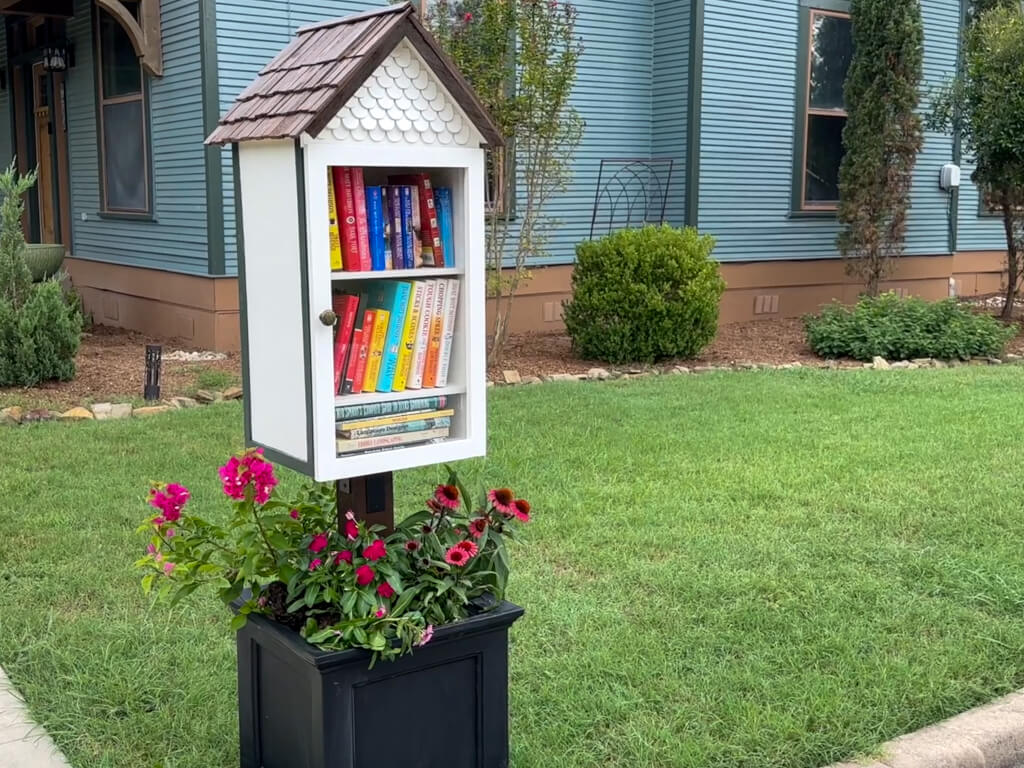
Pour in your potting soil, plant your flowers, add in your books, and voila! You now have a beautiful, functional, water-tight little free library.

For more DIY outdoor builds, check out DIY Ergonomic Cedar Rocking Chairs or DIY 3-Piece Cedar Outdoor Furniture Set.

Want to learn how to use power tools, make mitered cuts, and build with confidence?
Check out my course DIY Renovation for Beginners.
