
If you have a set of brick or concrete steps leading up to your door, it’s always a good idea to add a handrail for safety. You can build your own handrail system out of wood, but the easiest way to add railings is to purchase a handrail kit. And if you plan to install the railings on concrete or brick steps, there are some extra considerations for installation that you need to keep in mind. So, let’s get into it…
Project supply list
This post may include affiliate links, which means I may earn a small commission if you click on the link and/or purchase from that site. I use that money to keep this blog running. You can read my full disclosure policy here.
- Black 2-in-1 spray paint
- Railings
- Hammer drill
- Ratchets set
- Small level
- Measuring tape
- Painter’s tape
- Leaf blower
Step 1: Choose the right handrails for your steps

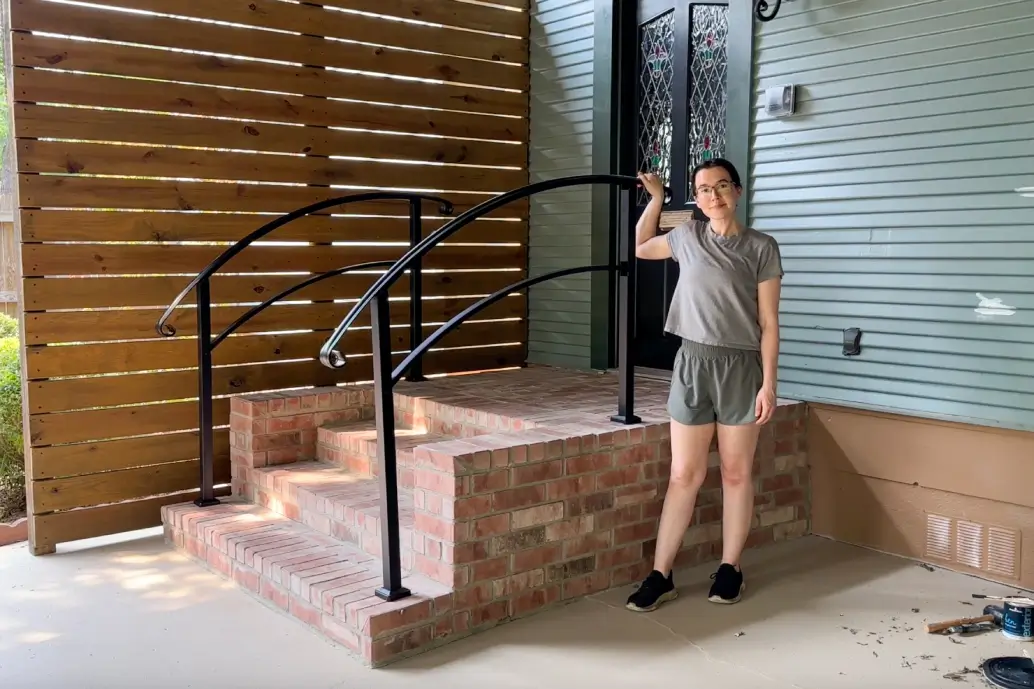
It’s important to remember that not all handrails will fit your steps. You need to take into account how many steps the railings need to span but also how long you want the railings to extend. For example, my parents’ back porch steps have four steps, so I could have purchased the railings that span four steps. But instead, I purchased railings that span five steps because 1) the stairs treads are wide and 2) I wanted the railing to extend as far back as possible on the landing of the top step.

I also chose railings in a curved style rather than the traditional diagonal lines with spindles between the rails. This was because the sides of the brick steps were built up in such a way that traditional railings would have run into them, but the curved rails fit perfectly. Keep all of these considerations in mind when choosing your railings to make sure they best fit your needs.
Step 2: Mark the location of your bottom post

It’s easiest to start with the position of your bottom post and work back to the top post. This is because railings tend to look best when the bottom post is centered on the width of the bottom step tread. And remember, this post should be placed on the top of the first step, not on the ground.
Since the sides of my parents’ brick steps were built up behind the first step, it was easy for me to mark the middle point of the side projection and the middle point of the stair tread width to find the center of where my bottom post should be. If your steps don’t have sides like this, simply place your post on the steps, take a step back to look at it, and keep inching it around until you find a placement you like. The railings can be as close to the center of the steps or as close to the sides as you prefer them to be.

Once you have your bottom post in position and centered on the width of the stair tread, check that it’s square. This means that the front of your post base is parallel to the front of the stair tread, and the side should be perfectly perpendicular. You can check that it’s perpendicular with a speed square, or simply use your measuring tape to ensure that both corners of the front of the post are the same distance away from the lip of the stair tread.
Then, use a pencil or marker to mark the center of each screw hole on the post base. Remove the post.
Step 3: Drill holes for expansion screws
Expansion screws (also called expansion bolts) allow you to anchor something sturdily in concrete or brick because traditional screws will not work. This is because traditional screw threads can’t embed themselves easily in concrete or masonry like they can in wood to provide a secure connection. Instead, expansion screws work by forming this secure anchor with tension.
An expansion screw has a bolt that runs through the middle of a metal sleeve, and there is a nut on the end of the bolt that keeps the bolt snug against the sleeve. As you use a ratchet or wrench to twist the bolt, the nut begins to tighten and move upward, flaring the metal sleeve outward, firmly against the inside of the concrete or brick hole. This tight connection is what keeps the bolt secure.

But in order to install your expansion screw, you must first pre-drill a hole. For drilling into concrete and masonry, it’s easiest to use a hammer drill. And in fact many expansion screws require holes made by drill bits that are too large for conventional 1/2″-chuck drills, so you’ll need to buy a new tool for this either way.
A hammer drill uses drilling action and hammering action at the same time to speed up the process and cut through concrete and brick like butter. I thought this tool would be unruly, scary, and difficult to work with, but honestly… it was a breeze! It barely gave me any resistance and had nice built-in shock absorbance so that my wrists and arms weren’t taking the brunt of the force. Highly recommend.


You will need to pre-drill your holes 1/4–1/2″ deeper than the length of your expansions screw. This will leave room for debris to fall down as you’re drilling and still leave room for your screw. To ensure you don’t drill farther than you need to, mark the desired depth on your drill bit with some blue painter’s tape.

Once you’ve drilled all of your holes, remove the dust either with a leaf blower or shop vac.
Step 4: Install expansion screws

After you’ve drilled your holes, you can simply pop in the expansion screws and they should fit easily inside, or you can use a rubber mallet to gently tap them in. Then, tighten the bolts down with a wrench or ratchet until very tight. At this point, the collar of the screw has flared out and secured itself against the inside of the concrete or brick.

Then, reverse your wrench or ratchet to remove the bolt. The sleeve should stay inside the hole. If it wiggles around instead, replace the bolt and keep tightening until the sleeve is fully secure. Then, remove the bolt again. You need all of the bolts out so that you can secure your post in place.

Place your post in position, and reinstall the bolts in the post bracket holes, tightening down into the sleeves again until the post is very secure. Make sure that the side of the post with the opening for the railings is facing toward where the next post will be.
Step 5: Find the placement for the top post

To determine where your top post should be on the steps, temporarily attach one or all of the railings to your newly secure bottom post. Then, attach the top post to the railings as well. This will help you see how far back that post should be. Use a level on the top post to make sure that it’s fully upright and not tilted at an angle. To determine how far in from the side of the steps the top post should be, use the same measurements from the side as your bottom post to ensure they line up perfectly.

Once you have your top post in position, level, and square, mark the center of the screw holes on the post bracket with a pencil or marker. Then, remove the post and temporary railings.
Step 6: Install the top post


Use your hammer drill to drill your screw holes, and clear the dust with a leaf blower or shop vac. Tighten down your expansion screws in the holes, remove the bolts, and use them to tighten down the top post bracket. Make sure the side of the post with the opening for the railings is facing toward the bottom post.
Step 7: Install the railings

My railing kit came with two railings—the top railing that people will hold and a bottom railing that provides more security and stability to the structure. Your set may have a different configuration. But if your set is like mine, first install the bottom railing. There should be enough room to install the rail without removing one of the posts, but if not, just temporarily loosen a post and then tighten it back down.

The hardware that attached the railings to the posts in my kit was silver, even though the rest of the railings are black. So I used a 2-in-1 black satin spray paint, and that helped them to perfectly blend in with the finish of the rest of the railings.

Finally, install the top railing by setting it down in position on top of the posts. Your instructions will be able to tell you more, but typically the longer end of the rail goes over the bottom post. Secure the rail to the posts with the hardware.
Step 8: Add final trim


My kit came with escutcheons to clip on over the bottom of the post to hide the bolts securing the bracket. You can choose which direction you want the seam of the escutcheon to face, but typically the seams are pointed toward the sides so that the smooth flat face is visible from the front of the stairs.

Congratulations—you now have beautiful, secure railings!
How high should front steps railings be?
The top of the handrail where you would place your hand for security should be 34–38 inches above the floor or nosing line. The nosing line refers to the diagonal slope of the steps as measured by connecting the outer edges of the stair treads.
What are some rules of thumb for handrail placement?
- Handrail height: 34–38”
- Max projection of railing from wall: 4.5” (if railing is attached to the wall and not the steps)
- Minimum hand clearance between railing and wall: 1.5” (and wall should not be rough or scratchy)
- Minimum distance between two railings: 30”
- Handrail diameter: 1.25”-2” (the handrail can be wider if it has certain finger recesses, but for example a plain 2×4 would not meet handrail graspability requirements)
- Handrail extension beyond top post: at least 12”
- Handrail extension beyond bottom post should be equal to at least one tread past the bottom riser

Want to learn how to tackle more home projects and use power tools with confidence? Check out my course DIY Renovation for Beginners.
