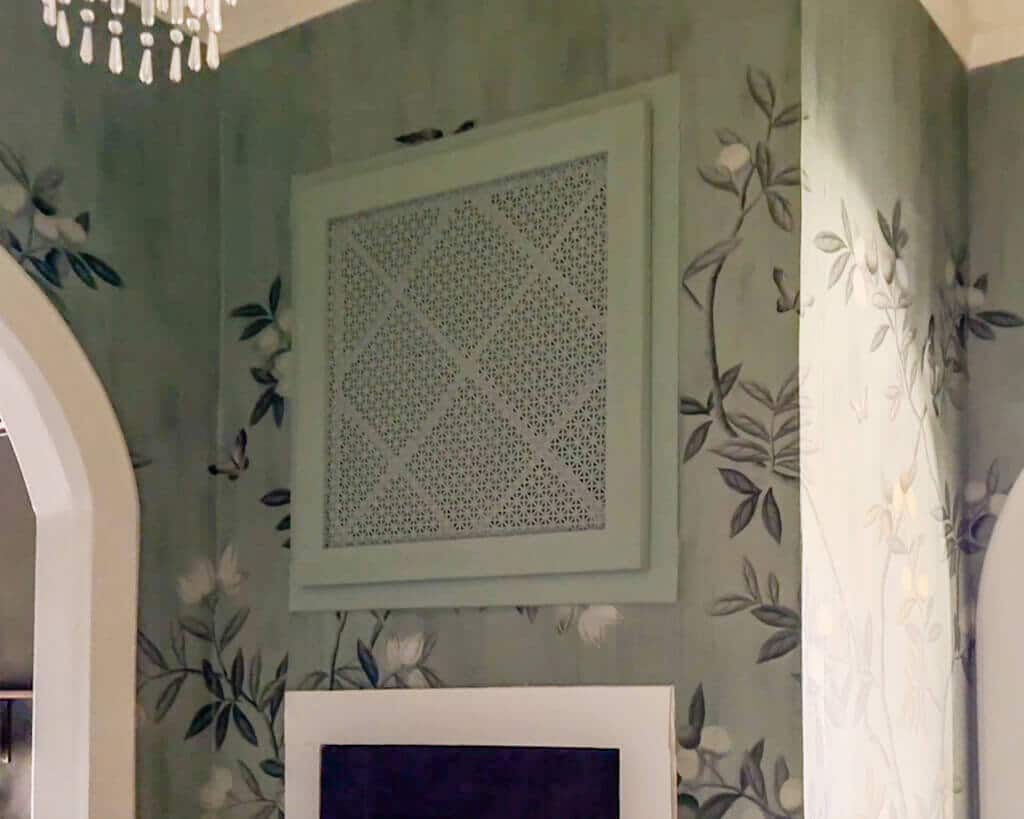

One of the biggest eyesores in my parents’ hallway was the giant air return sitting on the wall. I looked into buying a custom air return vent cover, but it would have cost $175 for the size I needed. So I decided to build my own and show you how to do it, too! So here’s how you can build your own low-profile DIY air return vent cover on a budget.
Project supply list
This post may include affiliate links, which means I may earn a small commission if you click on the link and/or purchase from that site. I use that money to keep this blog running. You can read my full disclosure policy here.
- 1/2″ x 2″ x 4′ poplar boards (I used 2)
- 1/4″ x 3″ x 4′ poplar boards (I used 4)
- 24″ x 36″ decorative sheet metal
- Miter saw or miter box
- Table saw (optional)
- Wood glue
- Clear Gorilla Glue
- Command strips
- Metal corner braces
- Miter spring clamps
- Spring clamps
- Aviation snips
- Spackle
- Sanding blocks or orbital sander
- Primer and paint of your choosing
Step 1: Remove your existing air return cover


If your air return cover looks like mine, you can undo the latches on the bottom of the cover, lift the bottom up to above a 90-degree angle, and then pull the cover straight out. This is the only piece of the air return that you need to remove for this project.
Step 2: Paint the surrounding trim (optional)

If your goal is to camouflage your air return into the surrounding wall/ceiling, now is also the time to paint the trim around the air return to match. If you’re not worried about camouflaging or if your air return does not have trim, you can skip this step.
I installed wallpaper after I painted all of the trim in this hallway, so I made sure that my air return trim matched the background color of the wallpaper.
Step 3: Measure air return and buy supplies


Measure the metal part of your air return from outside edge to outside edge. Measure in both directions if your return isn’t square. This measurement is the minimum width of the inside of your new DIY cover. Add 1/4″ to this measurement to ensure that your cover can fit comfortably over the return.
For me, this measurement was 26-13/16″ x 26-13/16″ since my air return was square. Adding the 1/4″ of wiggle room, this brought my final inner dimensions to 27-3/16″ x 27-3/16″.

To calculate your outer dimensions, you need to know the width of the material you’re using. I chose to use 1/2″-thick poplar for the outside edges, so I added 1″ (1/2″ x 2 outside pieces) to each inner dimension, giving me outer dimensions of 28-3/16″ x 28-3/16″.
I bought 2 pieces of 1/2″ x 2″ x 4′ poplar because I planned to rip these down on my table saw into thinner pieces, but if you don’t have a table saw and want to skip Step 4, you would need 4 pieces.
You can find these thin pieces of wood in the lumber aisle in the shelves beneath the long boards.
The largest decorative metal screen that I could find at the time was only 24″ x 36″, so I made up for the difference by using 1/4″ x 3″ x 4′ poplar for the front of the cover. I used the same outer dimensions measurement of 28-3/16″ x 28-3/16″ to determine what I needed, so I bought 4 pieces.
Step 4: Rip down the 1/2″-thick pieces on a table saw (optional)

If you have a table saw and want your cover to be as low profile as possible and fit perfectly flush over your air return, you can rip down the 1/2″-thick boards to this width: the projection of your air return from the wall/trim + 1/4″ for wiggle room. For me, this was 3/4″.
If you skip this step, your air return cover will still work perfectly fine but will just look a little blockier and not as low-profile.
Step 5: Cut your trim to size


Use your miter saw or a miter box to cut your trim at 45-degree angles, ensuring that you keep the length of each piece to your outer dimensions. Refer to the diagram below for the angles to cut in each piece of trim. Note that 2.5″ refers to the “3” side of the 1/4″x3″ piece of trim, which is actually only 2.5″ wide.

Step 6: Glue and clamp your edge pieces together


Now that the math is out of the way, it’s time for the fun part: construction! Start with the 1/2″-thick outer edges of your cover, and apply a few drops of wood glue to the ends of each piece. Then clamp the ends together using miter spring clamps to get a perfect corner.
Step 7: Glue and clamp your front pieces together


Then take your 1/4″-thick front pieces and run a bead of wood glue along each edge and clamp them together to form the front frame of your cover. Some inexpensive spring clamps will work perfectly here.
You only need to clamp these frames for about one hour, but be aware that the glue doesn’t fully cure for 24 hours, so handle your frames delicately until then.
Step 8: Glue your front and edge frames together


Once your front and edge frames have dried, remove the clamps and then apply a bead of wood glue around the top of the edge frame. Place the front frame on top, and clamp the pieces together firmly using your miter clamps and spring clamps.
I left this overnight to allow for more cure time.
Step 9: Fill and sand holes and seams


If you’re using miter clamps, you’ll notice that they leave little indents on your wood. That’s nothing a little spackle can’t fix. I also added spackle to the miter seams on my front frame and along the seam between the front and edge frames.
Once dry, sand smooth with a sanding block or orbital sander with 180 grit sandpaper.
Step 10: Prime and paint your cover and screen

To prevent flashing after using spackle, you should always use a primer before painting. I used a simple water-based primer, but if your wood has any visible knots, you should use a shellac-based or oil-based primer to prevent the tannins of the knots from bleeding through your paint.
Then, paint your cover. I suggest using at least a satin level of sheen so that your cover is more durable and easier to wipe and clean later on.

For the decorative metal screen, I find it easiest to prime the screen by spraying it with a 2-in-1 spray paint that sticks to metal. That way the holes in the screen are less likely to get gunked up with primer and paint. Then apply multiple light, thin coats of paint to the screen, again making sure that the paint doesn’t have a chance to build up in the holes of the screen and block air flow.
You can also just stick with spray paint if you find a color that you like, and that way you don’t have to worry about paint buildup.
Step 11: Glue the metal screen to your cover

Flip your wooden frame upside down, and rub a damp sponge or towel on the inner edges where you will lay glue your metal screen. This is a necessary step to ensure the adhesion of the clear Gorilla Glue that will attach the screen.
If you need to cut your screen to size, I suggest wearing gloves and using aviation snips. Be careful not to touch the cut metal, as it may be razor sharp.

Then, apply clear Gorilla Glue where your screen will attach. The tip on my bottle clogged, so I used a plastic knife to apply it.


I also took this time to glue some metal corner braces to the inside corners of the frame to provide more stability over time than just the wood glue.


Now, apply your metal screen to the wood glue. Make sure that you place the painted side of your screen down toward what will be the front of your cover. Clamp the screen down with heavy objects that you have on hand like spackle, tools, and quarts of paint. Don’t use anything too large or unstable that might accidentally slip and dent the metal screen.
Step 12: Cut and apply Command strips


Once your glue has dried, you can remove the clamping objects and add the final touch: the Command strip that will hold your air return cover in place. Your cover should be fairly lightweight, so if you’re hanging it vertically from a wall, you should only need one large heavy duty Command strip, which is rated for 15 pounds. Cut it in half along its length and apply one half on each side of the top of your back edge.
If your air return is on the ceiling, you will need to split the Command strip with one half on the top and one half on the bottom. Or if it’s a very large air return, I suggest using at least two Command strips cut in half for a total of four pieces. It will be more difficult to remove when it comes time to change the air filter, but it’s better than worrying about it falling down.
Step 13: Install your air return cover

Remove the paper covering the adhesive on the backs of your Command strips, and press your cover firmly in place over the air return. Then, pull the cover back off. The back of the velcro strips should stick in place above the air return, and the fronts should stay stuck to your cover. This is how you will remove and replace your air return cover when it comes time to change your air filters.

And there you have it! That’s how you build your very own custom air return vent cover. I hope this guide was helpful to you. For more DIY builds, check out DIY Little Free Library With Plans to learn how to build a little library from scratch for your neighborhood.

Want to learn how to use power tools, make mitered cuts, and build with confidence? Check out my course DIY Renovation for Beginners.

Hi Renee,
Do you think this could be adapted for a ceiling register? My stock one is noisy and I am considering making my own. We are handy….
Cindy