
So how much does it really cost to build two walls of built-ins using IKEA PAX wardrobes and from-scratch bookcases? And more importantly, is it worth it? I’ve broken down the process step by step for you, including individual costs. So without further ado… let’s get into it!

Project supply list
This post may include affiliate links, which means I may earn a small commission if you click on the link and/or purchase from that site. I use that money to keep this blog running. You can read my full disclosure policy here.
- PAX wardrobes
- Drill
- Driver
- Brad nailer
- Underlayment plywood
- 3/4″ birch plywood
- 1/2″ birch plywood
- 1/4″ birch plywood
- 3/8″ wood screws
- 1/8″ hardboard
- 3/4″-thick poplar
- Outlet box extenders
- Concealed hinge jig
- Pocket hole jig
- Spray paint tent
- Spackle
- Caulk
- 2-in-1 spray paint
- 320-grit or similar sandpaper
- Tack cloths
- High-quality paint
- Floetrol
- Airless paint sprayer (but I’d recommend this big one instead)
- Cabinet pullouts
- Brass window seat hinges
- Antique brass ring pull
- Paintable wood knobs
- Solid brass knobs
- Brass ager
- Dowel jig
- Dowels
Step 1: Build a platform


The purpose of building a platform for the built-ins is to raise their bases to the height of the baseboards in the room. If you have shorter baseboards, a 2×4 may be sufficient, but my parents’ 1915 home’s baseboards are over 7 inches tall. Plus, I needed to cut shorter platforms for the IKEA PAX wardrobes because they already have a short built-in base and taller platforms for my custom bookcases.

So I ended up cutting all of my platforms from two sheets of 3/4″ underlayment plywood. I use underlayment because it just needs to be sturdy, not pretty, because it will be covered up by baseboard later on. I pinned the platforms together with brad nails first and then screwed them together.


The trickiest part of the platforms is leveling them. This step is important because if your built-ins have doors or drawers and the platform isn’t perfectly level, they won’t align correctly, and it’s a nightmare. Learn from my mistakes and measure how much your floor falls and rises BEFORE you cut your platforms to make sure your built-in platforms still end up at the height of your baseboards.
Cost for me: ~$78
Step 2: Assemble and install IKEA cabinets

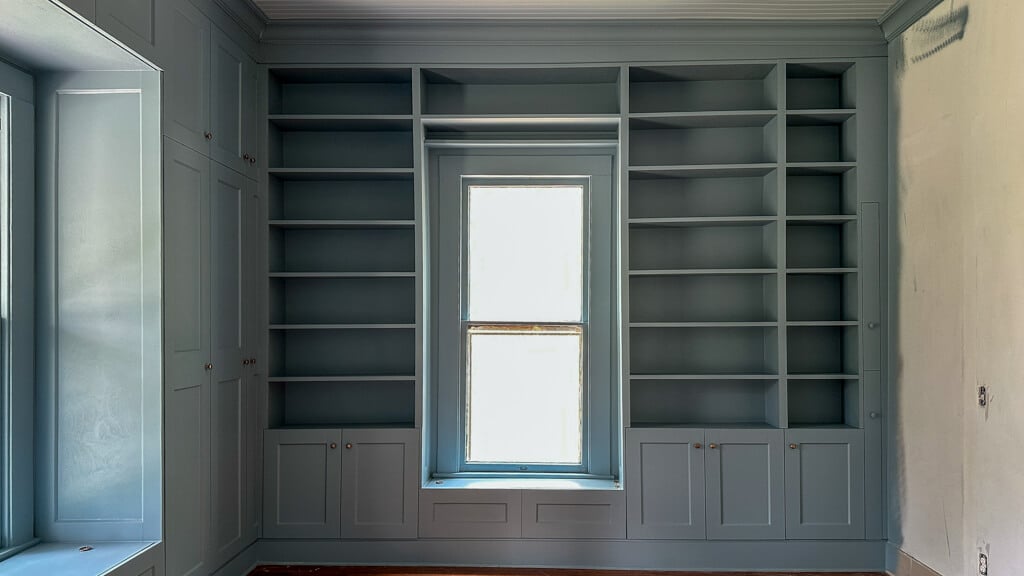
For the wardrobe wall, we used one double-wide and one single-wide PAX cabinet per side of the window. We made sure to set the double-wide cabinet in the corner that connects with the bookcases because otherwise the bookcases would cover the single-wide opening and make the cabinet unusable.

To buy these PAX boxes new would cost about $670, not including inserts, doors, and hardware, but fortunately there were already PAX wardrobes in this room when my parents bought the house. We just removed and sold the corner units (and applied those savings to our trim costs!) and used the wardrobes we wanted to keep.
Cost for me: $0 (typically, ~$670)
Step 3: Build and install custom cabinets and bookcases


Then came the most labor-intensive and expensive step in this process… building all of the custom cabinetry! For the single wall of built-ins I made in my parents’ bedroom, I used IKEA BILLY bookcases, but this time I wanted to challenge myself to build them from scratch. I’ll have a full blog post comparing the pros and cons of hacking BILLY bookcases versus building from scratch.


Just like in my parents’ bedroom, I had to build custom top cabinets to extend the height of the wardrobe wall all the way up to the 12-foot ceilings. This was Brittany’s first time building with pocket holes, and she did a great job! To make the cabinets a bit lighter for lifting so high in the air, we opted to use 1/8″ hardboard on the backs.


Since plywood only comes in 8-foot lengths and the ceilings are 12-feet tall, I had to get a little crafty to make the bookcases reach. I ended up buying a dowel jig and joining together the side pieces with wood glue and dowels to make the extra-long sides.


Then I used pocket holes for the majority of the bookcase construction, including the bookshelves. For consistent spacing between shelves, I suggest using two pieces of scrap plywood as spacers and placing them at the ends of each shelf before screwing it in.


The hardest part with building the bookcases was the racking, meaning that the bookcase wanted to tilt side to side without the back on. To fix this, Brittany would have to force the bookcase level while I screwed on the 1/4″ plywood back. We later learned that a better fix for this would be to screw a board diagonally to the front of the bookcase to hold it square while we attached the shelves and the back.


I also added pre-built cabinet pullouts to the side of the small bookcase to fill in the gap in one corner. These aren’t necessary whatsoever, but I hate wasted space and love extra storage. Typically, these inserts are used in kitchens for spices, but I could see them being useful as a medicine cabinet or storage for bathroom refills. This house doesn’t have any closets, so it can use as much storage as it can get!


We also built extra cabinets and bookshelves to go above the windows as well as storage chest window seats to go below.

13 sheets of 3/4″ birch plywood: $87 each = $1,131
5 sheets of 1/4” birch plywood: $35 each = $175
2 sheets of 1/2” birch plywood: $54 each = $108
3 sheets of hardboard: $20 each = $60
Special inserts: $140 each = $280
Cost for me: $1,754
Step 5: Trim out your built-ins


Trim is the part where the built-ins finally start to look built in, like they’re an existing part of the room. For this step, I used a bunch of 3/4″ poplar on the fronts of the bookcases as baseboards, to cover the exposed plywood edges, and to fill in the gaps between the built-ins and the walls.


I also used a lot of beveled paneling to match the look of the IKEA doors we added later. To create this beveled paneling, I took 1/2″ plywood and ran it through my table saw with the saw blade set at a 45-degree bevel.
Cost for me: ~$400
Step 6: Customize IKEA doors

I designed these built-ins to have doors on the bottoms of the bookcases as well as on the top cabinets, in addition to the tall doors we already needed for the PAX wardrobes. I wanted everything to look consistent, and I didn’t want to deal with the doors not matching, so I just purchased extra PAX doors and cut them down to the sizes I needed. You can find more on that process in my first built-ins project.
I was able to save a little bit of money on this step by finding all five of the tall PAX GRIMO doors I needed on Facebook Marketplace for $25 each, compared to $70 each new.
5 tall doors on FB Marketplace: $125
5 short doors: $65 each
6 sets of IKEA hinges: $22 each
Other hinges: $45
Cost for me: $627
Step 7: Fill, caulk, prime & paint

The prep work for painting is super tedious, but necessary! There’s no point in creating beautiful built-ins if you plan to leave them with lots of gaps, cracks, and rough edges.


To prep these built-ins for paint, we filled every single nail hole and exposed plywood edge, sanded them smooth, filled all of the gaps with caulk, and then masked off the room so that I could spray the paint with my airless paint sprayer.

We also primed the parts of the IKEA wardrobes that we wanted to paint with Zinsser BIN primer as well as all wood knots. For the rest, I sprayed a gray water-based primer.

The sprayer did a great job of applying the primer with no clogs, but it struggled with the paint. We used Sherwin-Williams Emerald paint, which is very high quality but also very thick, and the sprayer couldn’t keep up. I was constantly clearing out clogs, even with Floetrol added in. If I did this again, I would definitely use my heavier duty paint sprayer for this step.


For the doors, we primed them first with 2-in-1 spray paint and then we set up a spray tent outside, which made painting them a breeze. I highly recommend this!


I applied two coats of Sherwin-Williams Morning at Sea in a satin finish to the built-ins and doors and ended up needing four gallons of paint.
Cost for me: ~$450
Step 8: Add hardware

For the window seats, I used solid brass hinges and a ring pull for opening and closing the lid to the storage chest.


I wanted to make the pullouts on the side of the bookcases feel “hidden”, so I bought paintable wood knobs to blend them into the trim.


For the rest of the doors in the room, I used solid brass knobs and aged them in brass ager to make them less of a shiny gold and have more character. I have a big bag of these knobs laying around from a clearance sale several years ago, so we’re going to say these were free.
Cost for me: ~$50

Total built-ins cost: $3,359
Compared to paying a professional, I think this is probably a steal! Of course, it took me and my sister WEEKS to complete, but it was a labor of love for this house that had no closet space to begin with. Now, it has tons of additional storage and LOADS more character!
So what do you think? Was it worth it?

PS: If you want to learn how to use power tools and gain the skills to build your own cabinets, check out my course DIY Renovation for Beginners.

Hi Renee, the built ins are lovely! I recently found your YouTube channel and blog and have very much enjoyed seeing your process so far. I bought and renovated an old house (circa 1900), in Florida, several years ago and did most of the work myself as well. You have given me some cabinet and cupboard inspiration. I look forward to seeing more of your wonderful progress on your’s and your parents’ homes. Cheers!
Hello there! This is phenomenal! How many weeks did you and your sister spend getting this done? And did you work full-time every day, or just weekends, or something else?
Awesome! I’m trying to build some bases now for my Sekiton Ikea cabinets and are struggling with getting the dimensions right. Did you just cut the 2×4’s to match the dimensions of the cabinets or do you have to make it a bit shorter so the cabinet has a bit of overhang?