
Do you have old hardware with a brass coating that’s worn off? Or maybe just something new that you want to make look like antique brass? Either way, this antique brass faux finish is surprisingly easy to achieve, especially on smaller pieces! Let me show you how I achieved a realistic brass finish on my parents’ back door hardware…

Project supply list
This post may include affiliate links, which means I may earn a small commission if you click on the link and/or purchase from that site. I use that money to keep this blog running. You can read my full disclosure policy here.
Step 1: Paint your piece black

If you look at authentic antique brass, you’ll notice that some parts of the brass are much darker than others. Depending on the level of tarnish, these spots may even look black. This is what’s called patina, and it’s what you want in your faux finish, too!
Anyone can coat hardware in gold spray paint and call it a day, but it won’t have the realistic variations and patina of authentic aged brass, and that’s what we’re aiming for here. So you want to start with a base layer of black so that it can peek through the brass look we add later on. I like to use a 2-in-1 black spray paint because you need one that has primer built in that bonds to any surface. I prefer a matte finish because it allows for better adhesion of the brass layer.

Pro tip: Stick your screws into cardboard so that they stand straight up and can be spray painted easily without chasing them around.
Spray in multiple light passes rather than one thick heavy pass, and keep your spray paint can nozzle about 8–12 inches away from the surface. Getting too close or applying too much paint at once will both result in drips and sagging. If this happens, wait for the paint to completely dry, sand off the drips and marks, and then repaint with light coats until you get an even finish.
Step 2: Apply your Rub-N-Buff

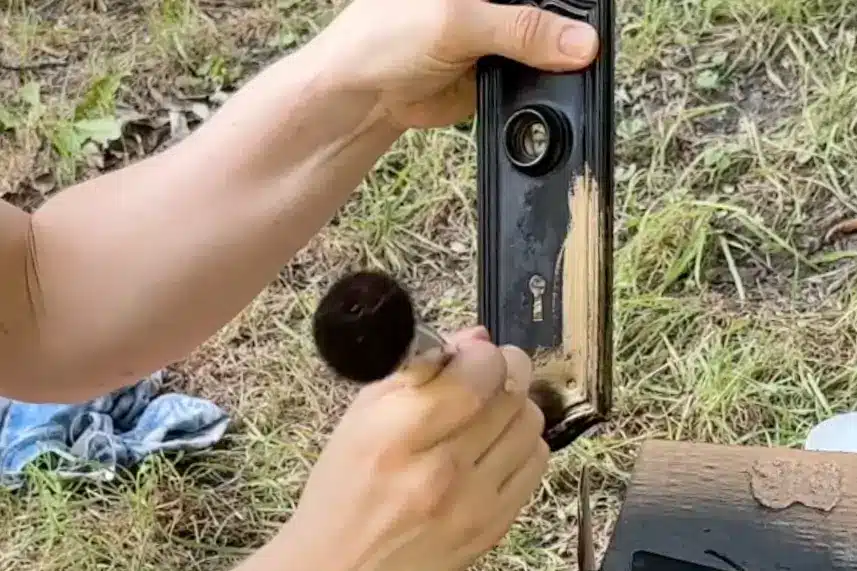
Rub-N-Buff is a wax-based product that leaves behind a realistic metal finish on whatever surface you apply it to. It does not stick well to slick surfaces, which is where the matte spray paint from Step 1 helps with adhesion. There are many shades of Rub-N-Buff, but in my opinion the most realistic shade for antique brass is European Gold. It has both warm and cool tones in it, which you will also find naturally occurring in old brass. But of course you can use whatever shade you prefer.

I like to squeeze some onto a scrap piece of cardboard and then use the smaller concealer end of a dual-sided makeup brush to apply the Rub-N-Buff to the hardware. Just dip your brush in and then use strokes or swirl it onto the surface. You can apply it selectively or all over your hardware piece.
Note that if you keep trying to apply more Rub-N-Buff but it starts removing some of the previous layer that you will need to wait for the first coat to dry before you can add a second. Even better, you can wait for the first coat to dry, do Step 4, then add more Rub-N-Buff, and repeat Step 4. This will ensure you never accidentally remove any of the first coat.
Once you finish coating the piece with the Rub-N-Buff, it’s time for the buffing part. Just take a clean rag and lightly buff it over the surface. This will remove any excess residue and create the realistic metallic sheen that Rub-N-Buff is known for.
Step 3: Add more patina

If you finish Step 2 and feel like your piece doesn’t have as much realistic variation and patina as you’d like, you can get a little creative here. I like to take a dab of black acrylic paint, but you can use whatever water-based black paint you have, and mix in a tablespoon or two of water until I have black-ish water. Then I take a small artist brush, dip it in the mixture, and brush it on the surface of my piece.

This method leaves behind a tinge of black, and some parts will look more concentrated than others depending on where the water settles and evaporates. Thus, patina!
Continue brushing as it dries to prevent water droplets from forming and leaving dots all over your piece. Move your brush consistently in one direction if you want to create a more “brushed brass” look. If it’s taking a while to dry or if you’ve added too much water, just dab the excess off with a rag and continue brushing until it dries.
Step 4: Seal your piece

Once you’re happy with how your antique brass finish looks, it’s time to seal it! This is a very important step, especially if your object will be used frequently, like door hardware. Otherwise, all of your faux finish will rub off eventually.
To seal the faux finish, I like to use clear spray paint enamel because it’s easy and gives a brush stroke-free finish. What’s also nice about this product is that you can change the look of your piece depending on the sheen of the enamel you choose. For this door hardware, I chose satin, but if I wanted a more aged and weathered look, I could have chosen matte instead.
Ideally, spray at least two coats of enamel, waiting the time recommended on the back of the can between coats.
Allow to dry completely, but ideally wait at least overnight before handling. This will allow the spray enamel more time to cure so that it’s harder and more durable, and it will allow it some time to off-gas outside and lose its spray paint smell.
And there you have it! That’s how you can make any small object, but especially hardware, look like antique brass.

If you’d like to learn how I patched and painted this door, head to How to Paint Your Front Door. To learn about more faux finishes, including how to make anything look like wood, check out my course DIY Renovation for Beginners, where I devote an entire module to faux finishes.
