
Benches are a great piece of furniture to have in your home… you can sit on them, throw shoes under them, and give your cats cute places to perch. But you know what’s even better? When your bench can do all of that AND have hidden storage. And it doesn’t have to cost an arm and a leg!
In this tutorial, I’ll share with you how to build your own sturdy solid wood bench with hidden storage from scratch. And it’s simpler than you may think…

Project supply list
This post may include affiliate links, which means I may earn a small commission if you click on the link and/or purchase from that site. I use that money to keep this blog running. You can read my full disclosure policy here.
- Lumber
- 2×4 sheet of 1/4″ sanded plywood
- 2×4 sheet of 3/4″ plywood
- Bench legs, options:
- My bench legs: 3″ interior storage height
- Other bench legs: 4.5″ interior storage height
- Straight legs: up to 11.25″ interior storage height
- Boards for apron:
- For my bench leg: 2 of 1x4x8 select pine
- For other bench leg: 2 of 1x6x8 select pine
- For straight legs: As wide as you want your storage depth (e.g. 1×8 for 7.25″ deep storage, or 1×12 for 11.25″ deep storage)
- 1/2″ thick piece of scrap wood for recessing apron (optional)
- Fasteners
- Hardware
- Upholstery
- 2″ thick foam
- Cotton batting
- 1 yard of fabric
- Upholstery backing
- Materials
- Wood glue
- White caulk for paint OR brown caulk for stain
- Baby wipes or Crocodile Cloth
- Spackle (optional)
- 220-grit sanding block
- Oil-based primer and paint, OR stain and sealant
- Spray adhesive
- Tools
Step 1: Cut apron boards to width (optional)


When you look at a table or bench, you’ll notice that there are side pieces all the way around that connect to the legs and hold up the table top. These side pieces form the “apron”. And in our case, the apron is also the sides of the hidden storage compartment inside the bench. So how wide your apron boards are will determine how deep your storage will be.

But there’s a catch. If you’re using turned legs like I am, you’ll notice that there is a big blocky flat part at the top of the leg. The height of this block determines the max width that your apron boards can be.
For example, if you use my bench legs that have a block height of 3″, you will need to rip your 1×4 boards down on the table saw to 3″ wide. If you use these bench legs, you will need to rip your 1×6 boards down to 4.5″ wide. If you use straight legs that are essentially all block, you can make your apron boards as wide as you’d like.
If you don’t have a table saw or just don’t want to go to the hassle of ripping down boards, your best bet is either to use these bench legs with 1×4 boards, or use straight bench legs with whatever width of board you’d like.
Step 2: Cut your apron boards to length

Now, you need to cut your apron boards to length. Hopefully you have an idea of the length and width of the finished bench that you want to build. If not, here is a standard proportion for a double seater bench, which we’ll use for this example: 20″ wide by 48″ long.
You will need four apron pieces total: two of the same size for the short side and two of the same size for the long side.
To calculate the length for the long side, take the total length of your bench and subtract 2x the width of the block on your bench leg. For example, 48 – (2.5*2) = 43. Cut two of your boards to 43″ long.
To calculate the length for the short side, take the total width of your bench and subtract 2x the width of the block on your bench leg. For example, 20 – (2.5*2) = 15. Cut two of your boards to 15″ long.
Step 3: Attach the apron to the legs

Now that your apron pieces are cut to both width and length, it’s time to attach them to the bench legs.
Take your pocket hole jig and make two pocket holes on each end of the apron board, making the holes on the uglier side.
This way later on, the ugly side with holes will face the inside of the storage compartment with the pretty part facing out.


Once all four apron boards have two pocket holes on each end, you can start screwing them into the legs. This is an optional step but one I prefer: I like to recess the apron pieces 1/2″ back from the surface of the legs. It’s completely unnecessary but just looks a little fancier. To do this, I lay down a piece of scrap 1/2″ plywood (but anything flat and 1/2″ thick will do), lay my apron board across it with the pocket holes facing up, and then lay the bench leg next to it but not on the 1/2″ scrap (see above).
Then, line up the top of the apron board and the top of the bench leg so that they’re flush, and clamp them together with a pocket hole clamp. Once secured, screw in the first pocket hole screw in the hole that’s still open. Remove the clamp and screw in that hole as well.


Flip your apron board around and repeat for the bench leg that connects on the opposite side. Then continue around the bench base, alternating short and long apron pieces and recessing the apron 1/2″ back from the bench leg.
Always remember to keep your pocket holes facing the interior of the bench as you assemble.
Step 4: Cut and install the storage compartment base


Take your 1/4″ plywood and lay it down on your work surface. Then, flip your bench frame over on top of it so that the legs are sticking up in the air. Use a pencil to trace the interior outline of the bench frame onto the plywood sheet.


Then, remove the bench frame and cut out the outline on your plywood sheet. I like to use a circular saw for the long cuts and a jig saw for the blocky cuts on the corners.

Dry fit your plywood in your bench frame to make sure that it fits before continuing. It should be a snug fit. If it doesn’t fit, make the necessary cuts and shaves until it does.
Then, measure the interior width of your storage compartment. This will be the distance between the inside of one long apron board and the inside of the other long apron board. Measure this interior width at four points: The far left side, left of middle, right of middle, and the far right side. These measurements needs to be exact, down to the 1/16″.


Take your scrap wood from cutting the apron boards and cut them to these four lengths. Like before, use your pocket hole jig to make two pocket holes on the end of each board. In cabinet-making terms, these will be your “stretchers” that keep your frame from warping and will also provide support for the base of your storage compartment.


Flip your bench frame upside down with the legs sticking up in the air. Wedge the first stretcher into the far right side of the frame, with the pocket holes facing up. The stretcher should be flush with the bottom of the apron boards. Remember that since the frame is upside down, the bottom of the apron will be the side that’s facing you (see above).

Like before, use the pocket hole clamp to clamp one hole while you screw in the other. Then unclamp and screw in the second. Repeat on the other side of the stretcher. Then, repeat for the remaining three stretchers, placing one to the right of middle, one to the left of middle, and one to the far left. Exact placement doesn’t matter, but you do want the bench to have relatively even support.

Now, turn your bench frame back over. Take your plywood insert and do another dry fit. Sometimes, screwing in the stretchers can warp the frame, so you may need to make some adjustments to the insert for it to fit again.


Once you’re sure that your insert will fit, pop it out and drizzle some wood glue on the top of each support. Then, pop your insert back in and nail it down to each support with 3/4″ brad nails. I used three brad nails per support, one on each end and one in the middle.
Step 5: Cut the bench lid


With your bench frame upright, measure the total length and width of your bench, and then cut your piece of 3/4″ plywood to size. You can use a circular saw for this or a table saw if you have one.
Dry fit the lid on top to make sure it perfectly fits your bench dimensions. Then, set the lid to the side. We’ll come back to it later.
Step 6: Paint or stain your bench frame

Major assembly is now done, and now it’s time to start making things pretty. If you’d like, you can fill the pocket holes and brad nail holes on the inside of the bench with spackle and sand them smooth. But I didn’t bother with this step because I don’t care if the inside of my storage compartment is a bit scraggly.
That said, I do recommend caulking the perimeter of the plywood insert to close up any gaps in your storage compartment. If you’re painting, you can use a white paintable caulk, or for stain you can use brown caulk or whatever matches the color of your stain.
If you plan to paint your frame, now is the time to go in with an oil-based primer or shellac-based primer that will lock in the tannins in the wood and keep them from bleeding through to your paint layer. For an extra smooth finish, lightly sand with 220 grit between each coat of primer and paint.


If you plan to stain your frame like I did, start by water popping your wood. This means rubbing the raw wood with a wet rag to raise the grain. You’ll notice that when the wood dries, it will now have a rough sandpaper texture. Sand it smooth with 220 grit sandpaper. If you skip this step and apply stain first, the stain will be what raises the grain on your wood and leaves you with rough stained legs.


After water popping and sanding, go in with stain. I used two coats of my favorite water-based stain, which is very forgiving, in the color American Walnut. I let the stain fully dry overnight and then sealed everything with two coats of oil-modified polyurethane, sanding lightly with 220 grit in between coats.
Step 7: Upholster your lid


While the poly dries on the base, it’s a good time to work on upholstering the lid. First, unroll your sheet of 2″ foam, lay your lid on top, and trace the outline with a marker. Put your lid to the side while you cut out the outline on your foam using an electric knife.


Take the lid and foam outside and attach the two with spray adhesive. It’s sticky and smelly, so it’s best to do this step outside of your home or workshop.


Then, bring the lid back inside, lay it down with the foam facing up, and drape your cotton batting over it. Use your stapler to secure the batting to the underside of the plywood. Start with one staple in the middle of the short side, then move to the opposite short side, pull the batting taut but not so much that it warps the foam, and put a staple in the middle of that side as well. Repeat for long sides, one staple in the middle of each side, pulling the batting taut over the foam.
Continue alternating your staples like this to achieve a smooth, wrinkle-free finish. For cutting and folding your corners, I suggest watching this tutorial.


If you’re like me and don’t have an electric stapler, just use a hammer to hit in any staples that don’t sink fully into the plywood at first.


Once you’ve finished securing your batting, flip the lid over and cut off the excess batting. Then, flip the lid back over and repeat the same draping and stapling process for your fabric. Don’t worry if the underside looks scraggly and ugly… we’ll get to that in a bit.

If your fabric is patterned like mine, take extra care to try to line up your pattern to be as symmetrical as possible on the lid, and avoid pulling your fabric so much when you staple it that you warp the pattern.

Once your fabric is fully stapled and secured, flip it over and cut off the excess. Now, it’s time to cover up the ugly bits with upholstery backing. Cut a piece that is the full length and width of your lid. Then, fold under the rough edge on each end and staple it in place. This backing should cover all of your previous staples and excess fabric. Continue folding under the edges of the backing and stapling it around the perimeter.
And there you have it! A perfectly upholstered bench cushion without ever needing a sewing machine.
Step 8: Final assembly


Now, it’s time to attach your lid to the bench frame. If you have wood floors, it’s always a good idea to attach some floor protectors first. I like the rubber ones that screw on to the leg bottoms that also keep the bench from sliding around.


Once that’s done, set your bench frame upright and lay the lid on top with the black upholstery backing facing up. Install three hinges on the long side of the lid, with half of the hinge attached to the plywood and half dangling off the side. I like to pre-drill my holes before screwing in the hinges to prevent splitting. I installed one hinge in the middle and then the other two spaced 6″ from each end, but you can eyeball it and choose the spacing that looks right to you.


You can either have a strong helper hold your lid in place over the back of the bench while you drill and screw in the hinges to the back of the bench, or you can be like me and measure the spots for your side hinge screws, pre-drill the holes, and hold the lid in place with one hand while you screw in the side hinge with the other hand. Once both side hinges are screwed in, the lid will be secure enough that you can let go to drill and screw in the middle hinge.


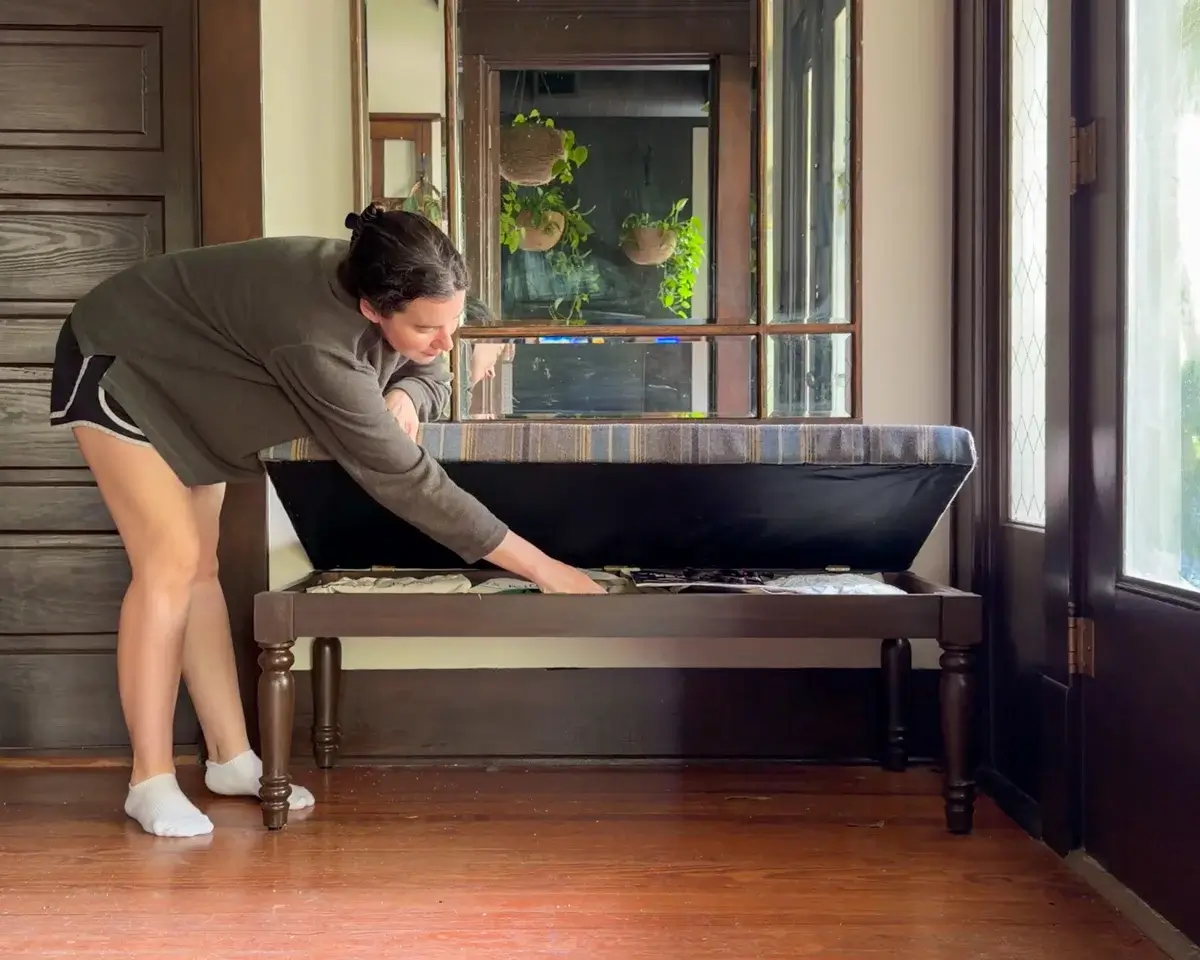
Then, fill it with treasures. I have the bench leg option with only 3″ wide apron boards, so my hidden compartment is pretty shallow, which suits me just fine. I use it to store my shopping bags as I walk out the door, and I like that the profile is so slim that no one would ever guess there’s secret storage inside.
Close the lid, step back, and admire your beautiful work!


For more DIY builds, check out my DIY Little Free Library Planter Box or DIY 3-Piece Cedar Outdoor Furniture Set.

Want to learn how to use power tools, make mitered cuts, and build with confidence?
Check out my course DIY Renovation for Beginners.
