
Unlike concrete acid stains and semi-transparent concrete stains, a solid concrete stain doesn’t show any color differences or imperfections underneath. Instead, it provides fully opaque coverage and gives an even appearance. It’s great for matching concrete slabs of different ages and shades as well as hiding concrete crack patches.
But because solid color concrete stain is a film-forming stain—meaning that it only forms a layer on top and doesn’t penetrate below the surface of the concrete—it acts much like paint. In that way, it can also peel or lift up over time if you don’t take the proper precautions to prep your concrete before staining. And if you use the BEHR stain like I did, it can also be difficult to find an accurate stain color. But thankfully, I’ve done all of that leg work for you! So, let’s get into how to apply solid color concrete stain…

Project supply list
This post may include affiliate links, which means I may earn a small commission if you click on the link and/or purchase from that site. I use that money to keep this blog running. You can read my full disclosure policy here.
- Pressure washer
- Concrete paint stripper (optional)
- Concrete etcher (optional)
- Leaf blower
- Five-gallon bucket
- Bucket paint grid
- Set of brushes
- Staining pad
- Extension rod
- Concrete bonding primer
- Solid concrete stain (the good shade)
- Anti-slip floor finish additive (optional)
- Infrared thermometer
Step 1: Prep your concrete surface

To get started, it’s important that you clean most of the dirt, mildew, and other grime off your concrete’s surface. All of this gunk will prevent your stain from bonding properly. And again, because this stain acts more like paint, it’s important that you do everything possible to get good adhesion.
I used a pressure washer to clean the concrete on my parents’ back porch. This doesn’t need to be the strongest PSI pressure washer you’ve ever seen—I just used one that’s good for general cleaning and was able to remove most of the gunk.

You may find globs of concrete filler or sealant or paint stuck to your concrete from drips over time. If you have a stronger pressure washer, you may be able to remove them that way. But otherwise, you can always chip them off with a putty knife and some elbow grease.
If your concrete was previously painted, stained, or sealed, I have some not so great news for you…
- If your paint, stain, or sealant is peeling, you at least have to scrape up any peeling bits and then scuff sand the entire surface to make sure nothing else lifts up. Your concrete stain’s bond will only be as strong as the previous film’s bond is to the surface of the concrete.
- If the previous film is in really bad shape and lifting off everywhere, you need to remove it all. Sometimes this can be done with a powerful pressure washer, but otherwise you’ll need to use a concrete paint stripper.
Once your surface is clean, you may need to etch it. Concrete etcher uses acids to open up the pores of your concrete and adds texture to allow for better adhesion of your stain. This is a necessary step if you’re working with smooth concrete, but my parents’ concrete is rough and highly textured already, so I opted to skip this step.
Step 2: Prime your concrete

So you’ve cleared your concrete surface of loose coatings and grime, maybe etched it, and then allowed the concrete to fully dry… now there’s still one more step you need to take to ensure proper adhesion: priming.
And not just any primer. Be sure to use the primer that your stain recommends. In my case for the BEHR Solid Color Concrete Stain, the recommended pairing is the brand’s Concrete and Masonry Bonding Primer. Why? Because it’s specifically designed to bond strongly to both the concrete and their specific formula of stain to glue the two together and prevent peeling.
Using the primer also helps to provide a more even topcoat finish with fewer coats required, and it can be used on top of raw concrete or old paints, stains, and sealants that are still in good shape.

Use a leaf blower to easily clear your working area of leaves and debris. Then, you can apply the primer with a pump sprayer for ease of use, or I just cut in around the edges with a brush and rolled on the rest with a 3/8″-nap roller cover. Rolling can cause splattering, but because this product is clear, it’s not super noticeable if a stray drop flies here or there.
As you’re applying it, be sure to start furthest away from your exit point and work your way backward to the exit so that you don’t paint yourself in a corner and end up having to step on the drying primer because it can take two hours to fully dry.
Wait four full hours before applying the stain on top. You can also wait a few days, but the stain needs to be applied within 30 days, or you’ll have to re-prime. I wouldn’t recommend waiting too long anyway because the grime and dirt will build back up, and you’ll have to clean the surface again.
Step 3: Apply your solid color concrete stain

Once your primer has had at least four hours to dry, you can apply your stain. Again, use your leaf blower to remove any new debris or dust before you begin. Also make sure that temperature conditions are correct for application. BEHR says their products should only be applied when air and surface temperatures are between 50–90 degrees Fahrenheit (10–32 degrees Celsius).
The surface temperature is very important because even on an 80-degree day, a slab of concrete out in the sun can reach well over 100 degrees. To check if your concrete is in the required temperature range, you can use an inexpensive infrared thermometer.


If you plan to use multiple cans of stain, it’s recommended that you mix them together first before applying them because there can be small variations in color from can to can. (This is also a good idea for paint!) I did this by pouring my cans into a five-gallon bucket and mixing them together with a paint stir stick. You could also use a mixer attachment on a drill, but the stain is thin and I could see that getting very messy very quickly. If your surface is very slick, you may want to mix in an anti-slip floor finish additive.

If you plan to roll your stain, you can also use a five-gallon bucket paint grid to eliminate the need of pouring the stain in a paint tray. You can just dip your roller in the stain, coat it on all sides, remove the excess on the paint grid, and start applying it.

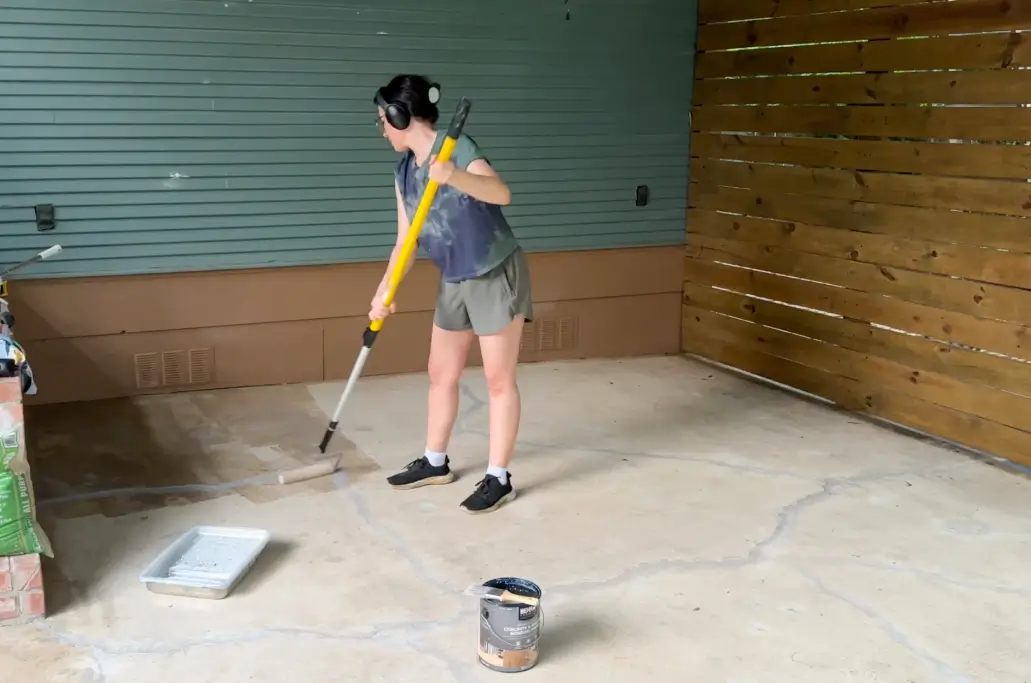
But rather than a roller that might splatter, I opted to cut in edges with a brush and then use a staining pad with my extension rod, and I highly recommend this method. The stain went on so smoothly and evenly with the pad, with no worry of drips or splatters. If your concrete is rough and highly textured, I recommend using an exterior staining pad that won’t tear as easily.
The application itself was a breeze. What wasn’t a breeze, however, was the color selection. I ended up buying four different shades of stain because not a single stain color matched what was shown on BEHR’s website. And I understand that color theory and lighting can make a big impact on how our eyes perceived colors, but I tested the shades in multiple lights against multiple colors, and the undertones were still completely different from what was shown online.
Usually, I would never trust a paint color, for example, that I see on my computer screen, but they’re often at least directionally correct in terms of tone and shade. These stain colors? Not at all. And unlike paint, you can’t get stain samples to test out or even order them by the quart. This product only comes in a gallon can.


The first concrete stain color I chose was BEHR Pebbled Path. I was really excited about this warm taupe-y gray that I felt would be a perfect mix of cool and warm tones. But when I painted it on the edges and backed away… it looked lavender. I chalked this up to color theory because it was painted next to an orange-y brown. So then I swatched it next to some cool gray concrete steps in different lighting. Still lavender.


So I went back to the store and purchased another color, BEHR Spanish Parador. It looked like a light warm beige, and I again had high hopes. I painted it on… and it looked gray. Corpse-like.


At this point, I figured that all of their concrete stains must be much lighter than how they appear online, so I then went back to the store and ordered BEHR Pyramid, a dark warm beige. I painted it on… and to my shock this color actually matched the color online more closely. Which is great news if you’re interested in the color Pyramid, but if you’re like me and were betting on it turning out much lighter, prepare to be disappointed.
I kept combing through the stain’s reviews, looking for any that actually had a photo attached because every mock-up provided by the brand was a Photoshopped image of the exact swatch color copy-and-pasted on a slab of concrete. And clearly, the swatches don’t match how they look in real life.
As I scrolled through reviews, I found that this was a common complaint, even when customers looked at the stain colors in a physical book and not on a screen. I finally found a review from a woman named Lynn who disliked the first color she chose but liked her second color. And bless her, Lynn shared a photo of how it looked in real life and the name of the color she chose… and it looked so promising!


So as a last ditch effort, I went back to the store and ordered this final stain color: BEHR Washed Khaki. If this didn’t work, I was going to give up altogether. Thankfully, it turned out to be a lovely light soft beige. Did it match the swatch color online? Nope! But I’ll take it as a win. I can’t recommend any of the other stain colors I tried, but if you want a reliable light beige, Washed Khaki is for you.

For even coverage, I applied two coats of the stain. BEHR recommends waiting at least 2–4 hours between coats, but I waited overnight. It says it has a flat finish, but I did notice a slight sheen after it dried. If this bothers you, you can sprinkle on some sand and then sweep it away to provide a more matte appearance.
Step 4: Allow your stain to cure

It’s very important to note that just like paint, this stain has a cure time. You need to wait the recommended cure time—not just dry time—in order for the stain to reach maximum durability and hardness.
BEHR recommends waiting 24 hours for light foot traffic and avoiding placing heavy objects like big planters or car tires on the surface for 14 days. If you need to park your car or move that planter, do it on corrugated cardboard over the stain in the meantime to prevent the stain from sticking to your planter/tires and peeling up when you move them. After those 14 days, you can also wash the stained surface with mild soap and water.
And there you have it… your concrete is now properly stained!
Can you apply concrete stain with a roller?
Yes, you can apply concrete stain with a 1/4″–3/8″-nap roller cover. But I wouldn’t recommend using a roller, as it can fling the thin stain around easily and create drips and splatters. Instead, I recommend using a staining pad.
What is the best way to apply solid stain?
Apply solid concrete stain by cutting in around the edges with a paint brush and then using a staining pad to fill in the rest. If you work quickly, you can pour your stain directly onto the slab and then disperse it evenly with your staining pad. This is a similar method to how professionals use staining pads to apply sealants to hardwood floors.
How long does solid color stain need to dry?
Always check the back of your specific can for instructions, but typically solid color concrete stain takes 2 hours to dry to the touch and 24 hours for light foot traffic. It will take at least a couple weeks to fully cure for heavy use, like for parking cars and moving heavy furniture.
Does solid concrete stain peel?
Solid concrete stain forms a film on top of the concrete rather than penetrating below the surface. So like paint, it has the potential to peel. You need to take proper precautions like cleaning, etching, and priming the concrete before staining as well as waiting the recommended cure time to prevent peeling. But just like with exterior paint, weather and sun exposure will gradually wear on the stain over the years, and it will eventually begin to peel and require repair.
I hope this guide was helpful to you on your concrete staining journey! You may also want to read How to Fix Cracked Concrete: Putting Two Methods to the Test. And if you want to learn more skills for renovating your own home, check out my course DIY Renovation for Beginners.
