
If you’re like me and hate when your metal vent covers stick out like sore thumbs in an otherwise beautiful room or exterior, here’s how you can make them virtually disappear. And the best part? This inexpensive fix won’t block air flow, like hiding them behind furniture would. Without further ado, here’s how to paint vent covers to camouflage them into your walls, floors, ceiling, or siding…

Project supply list
This post may include affiliate links, which means I may earn a small commission if you click on the link and/or purchase from that site. I use that money to keep this blog running. You can read my full disclosure policy here.
- Compressed air (optional)
- Tack cloth (optional)
- Screwdriver or impact driver
- 2-in-1 spray primer/paint
- Airless paint sprayer OR small paintbrush set
- Cardboard
Step 1: Remove and clean your vent covers

Use a screwdriver or impact driver to remove the screws from your vent covers so that you can remove the cover itself. Hold on to the screws because you’ll need to paint them as well.
If your vent covers are very dirty, you may want to clean them in the sink with dish soap, water, and a scrubber brush to get in all of the vent openings. Be sure to let them dry thoroughly before moving on to Step 2.
If your vent covers aren’t too dirty, you’ll still want to remove any lingering dust or debris. To do this, you can use compressed air or a tack cloth to get them nice and clean.
Step 2: Prep your painting space

Since we’ll be using spray paint, you’ll ideally want to do this project outside. I recommend laying down cardboard on your lawn and placing the vent covers on the cardboard. If it’s too cold or rainy to paint outside, find a protected space with good ventilation like a garage or an interior room with the windows open and fans to aerate the room.

Pro tip: To make it easy to paint the screws so that they don’t just roll around, poke the tips of the screws into the cardboard to keep them standing up. You may have to twist them a bit clockwise so that they’re stuck in the cardboard enough to remain fully upright. This will make it super simple to paint the screw heads from all angles later on.
Step 3: Prime your vent covers and screws

Once all of your vent covers and screws are laid out on the cardboard, it’s time to prime. The easiest way to do this is to either use a spray primer alone or (my preference) to use a 2-in-1 spray primer/paint combo in a shade similar to your final color. Check that whatever option you use works for metal or the material that your vent covers is made of.
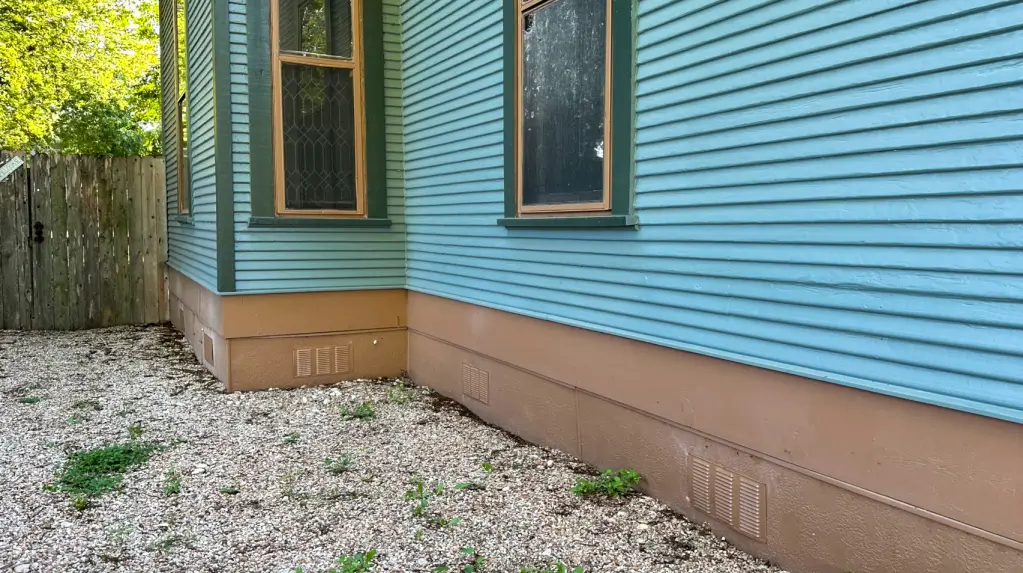
For example, I chose a brown shade for these crawlspace vent covers that is similar to the siding color I want to match. This means I won’t need to apply as many coats of the final color later on, whereas with white primer you may see it peeking through. Of course, if your final paint color is in the white color family, you can stick with just a spray primer.
I suggest using a spray paint with a lower sheen like Flat, Matte, or Satin because it will be easier for your paint to adhere to it in Step 4.
To avoid drips when spray painting, opt for multiple coats of light, even passes rather than one big heavy coat of paint. Be sure to get between the slats and all the way around your screw heads. Any place you don’t prime properly may result in your paint peeling later on.
Step 4: Paint your vent covers and screws

Once your primer coat has completely dried, you can start painting. For a flawless spray paint-like finish, I prefer to use an airless paint sprayer for this. But if you don’t want to buy this tool, you can always hand paint using small paint brushes to get in all of the vent slots.
Either way, you’ll want to use the exact paint of your wall, floor, ceiling, or siding that you want the vent covers to camouflage into. If your floor isn’t painted, pick a color similar to the floor in the area where the vent is located and in a similar sheen (e.g. matte brown paint for matte oak hardwoods).
Whether you’re spraying the paint or applying it by hand, opt for multiple light coats of paint rather than thick heavy coats that will drip or sag on your vent covers and screws.
Step 5: Wait for your paint to cure and reinstall

Waiting for your paint to cure is very important, especially for the screws. Cure time is how long it takes for your paint to reach full durability. Look on the back of your paint can to learn how long it takes your particular paint to cure.

If you reinstall the vent covers right after they dry rather than waiting the recommended cure time on the back of your paint can, you may find that the paint on the vent covers and screws chips and scratches easily. If you don’t mind doing touch up paint, then go for it. But if you want to preserve the flawless finish, wait the recommended cure time.
Step 6: Step back and admire!


Your vent covers should now camouflage into their surroundings. I’ve used this trick before on ceilings, walls, and now siding, and it’s an easy, inexpensive way to hide the vents without affecting their functionality.
Want to learn more DIY tips and tricks? Check out my course DIY Renovation for Beginners.
