
Whether you’re painting your front, back, or side door, there are a few additional steps that you need to take whenever you’re painting an exterior door vs. an interior door. Because exterior door paint needs to hold up against everything from extreme weather and UV rays to armfuls of groceries and impatient pets, it’s always a good idea to follow these steps to ensure you get a durable, long-lasting paint job.

Project supply list
This post may include affiliate links, which means I may earn a small commission if you click on the link and/or purchase from that site. I use that money to keep this blog running. You can read my full disclosure policy here.
- 2-inch cut-in brush
- 4-inch roller
- Paint pail
- Set of small brushes
- Orbital sander
- Liquid sandpaper
- Acetone (optional)
- Shellac-based primer
- Floetrol for water-based or alkyd paints OR
- Floetrol for oil-based paints
- 1 quart of high-quality exterior paint (satin or higher sheen)
- Bondo
- Dropcloth
- Paintable caulk
- Caulking gun
- Tack cloths
Step 1: Remove hardware

Before you can do anything, it’s important that you remove any hardware that you want to protect from primer and paint. If you try to cut in with your paint brush around hardware, you’re likely to still get paint on the piece and will end up with what’s called a “landlord special.” Not only does that not look appealing, but it also may glue your hardware in place and make it difficult to remove later on. So it’s best to just remove everything to begin with.

If you’re removing anything else permanently, like old door knockers, signs, or screen doors, now’s the time to do it. This will help expose all of the cracks and holes that you’ll want to fill in Step 2. And you never know what you’ll find behind old decor! Under this telephone sign, I found an antique mail slot that I was able to restore, and it made the finished door feel even more special.
Step 2: Fill holes and cracks

If your door has old screw holes or cracks that you want to cover up, now’s the time to do it! For exterior projects like this, I don’t recommend interior products like spackle or crumbly wood filler. Instead, I suggest that you use a filler that dries rock hard and can withstand the elements like Bondo.
Bondo is a two-part filler, meaning that you need to mix the filler and hardening agent together to activate it. I like to do this on a scrap piece of cardboard with part of a paint stir stick that I’ve snapped in half. Anything Bondo touches will need to be thrown away after, so it’s best to use materials like these that you don’t care about.
Just mix the two filler components together until the color is even, and then apply to holes and cracks. It’s important that you move quickly because you have a limited working time with Bondo before it starts to harden. I suggest working in small batches until you get used to it so that you don’t end up wasting a lot of product that dries too quickly.

Bondo will dry rock hard, so leave a little bit of a bump on all of your patches so that you can sand them flush, but don’t leave too much excess because it’s difficult to sand. When the filler is dry and ready to sand, I like to use 120 grit sandpaper on my orbital sander. Again, this stuff dries rock hard, so be prepared to spend a while sanding to get things nice and smooth.
Step 3: Caulk and clean

In addition to filling holes and cracks, you’ll also want to fill any uncaulked seams on the door trim. I like to use ALEX Plus, which I think has the easiest consistency to work with. I apply it with my caulking gun and then use baby wipes to smooth the caulk down and across the seams.

Finally, take some liquid sandpaper on a rag and wipe it all over the door surface that you plan to paint. This will simultaneously clean up the door and remove dust while also roughing up the paint surface to allow for better adhesion for your new primer or paint.
Step 4: Prime your door

At the very least, you will need to paint some primer on top of your Bondo patches to prevent the filler from flashing through your paint. Flashing means that the filler spot will show up as a more matte sheen under your shiny paint, leaving your paint job looking like it has matte polka dots. I suggest using a shellac-based primer over the Bondo.
You may also wish to prime the entire door, especially if you’re not sure what kind of paint the door was coated with before or if you’re painting over bare wood. If the former and you plan to use a latex-based exterior paint, it’s important that you check if your door was previously painted with an oil-based paint. If so, your latex-based paint may peel off as soon as you apply it because oil repels water.
To test if your door was previously painted with an oil-based paint, dip a rag in acetone and rub it repeatedly on the door paint. If some of the paint color comes off the door and onto the rag, it was latex-based paint; if no paint color comes off the door and onto the rag, it was oil-based paint. Either way, if you plan to use the opposite kind of paint for your new coat, you will need to prime first.

You can also just prime your door no matter what the paint was before if you’d like to ensure better adhesion of your paint. Regardless of the reason, use either an oil-based or shellac-based primer. Both of these will work for oil-based and latex-based paints and will allow for the transition from one to the other. I prefer a shellac-based primer because it’s thinner and less likely to add brush marks and texture.
Any applicator that you use with oil-based or shellac-based primers will need to either be washed thoroughly with mineral spirits or thrown away, so don’t use your favorite paint brush. Instead, I use little artist brushes to cut in around details and then a 4″ roller cover to coat the rest.

Once your primer has dried, give it a light hand sand with 320 grit sandpaper to remove any texture or dust that was trapped. Remove the dust with a tack cloth before you paint.
Step 5: Paint your door

If you’re using latex-based or alkyd paints that can be cleaned up with soap and water, this is when you can bring out your favorite painting tools. I like to have my paint pail with a liner, a 4″ roller and cover, and my favorite cut-in brush for trim paint on hand. I use a roller cover with a 3/8″ nap because I don’t mind a little texture, but if you want an ultra smooth surface and don’t mind painting several more coats, you can use a foam roller cover.
First, open your paint and give it a good stir. Then, pour in some of your paint in your pail or tray. I recommend adding a capful or two of Floetrol, which is a paint additive that helps prevent roller and brush marks to create a more even appearance. Mix the Floetrol in thoroughly and then begin cutting around the edges of your door and anywhere the roller cannot easily reach like intricate trim details with your cut-in brush. Immediately follow this up with your roller along the broader parts.

I recommend working in sections, starting at the top of the door with a brush and roller, then the middle, and then the bottom. The goal is to keep a wet edge so that it’s not obvious once the paint dries where you stopped and started, so move quickly.
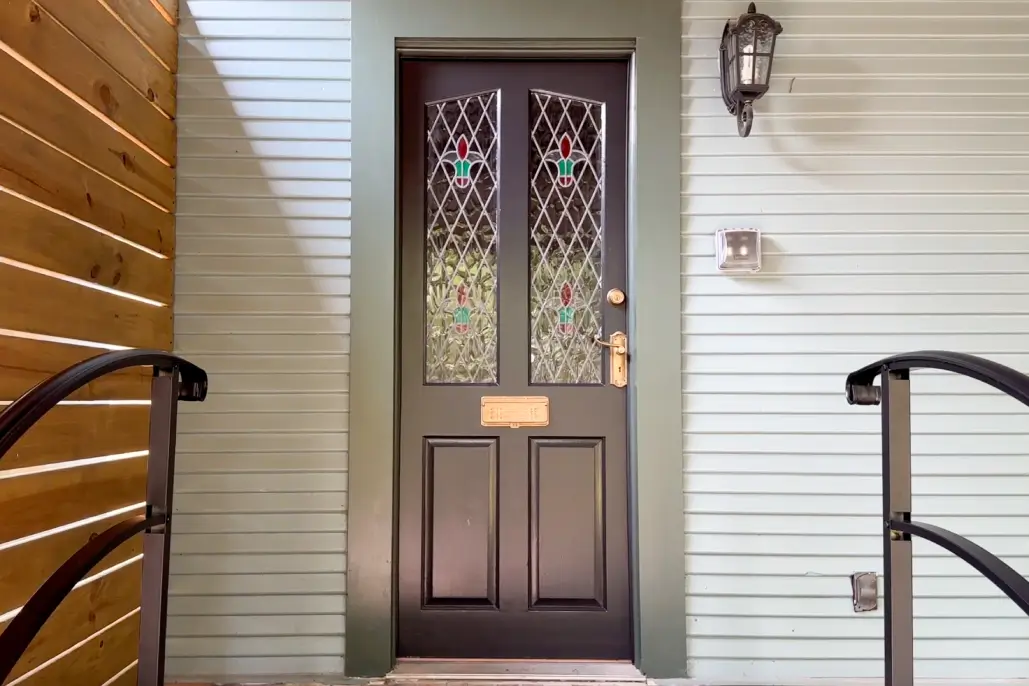
For an ultra smooth finish, you may wish to hand sand lightly between coats with 320 grit sandpaper and use a tack cloth to remove dust. Even if the paint says it has “one-coat hide,” plan to do at least two coats. It took me three coats to take this door from white primer to solid black paint. If you like this paint color, I used Benjamin Moore Black in a satin finish.
Step 6: Replace hardware and let cure

Ideally, with any paint project you’ll give your paint enough time to cure. This is the time that it takes your paint to reach full hardness and durability. Even if you buy the most durable paint on the market, it may not fully cure for several weeks, which means that it can still dent and scratch easily in the meantime. Check the back of your paint can for its specific cure time.
But with exterior doors, it’s pretty impossible to wait a few weeks or even a few days to make it functional again. Realistically, you may just have a few hours. So at least wait until the door has had time to fully dry before carefully replacing the hardware. Then, just try to be delicate with your door until the cure time is complete—no moving heavy furniture or bumping packages against it for a bit.

Once the cure time is complete, congratulations! You now have a beautifully and durably painted exterior door.
Should I paint my front door with a brush or roller?
Use a brush and roller in combination to get the best paint finish on your door. Cut in first with your brush around edges and details, and then roll the larger flat surfaces. Work in sections and move quickly to maintain a wet edge and prevent roller marks once the paint dries.
Can you paint a front door without sanding?
Yes, you can paint a front door without sanding, especially if the previous paint isn’t very shiny or smooth. But if you have a semigloss or high gloss door, you will need to sand first to rough up the surface and allow for better adhesion of your new paint. But sanding is never a bad idea. If you want to avoid the dust and mess of sanding, rub your door with liquid sandpaper instead, which cleans and roughs up the surface of the door at the same time.
How do you paint a front door without brush marks?
To prevent brush marks, make sure that you’re painting in ideal conditions. Paint will dry more quickly on a hot, dry day, which is more likely to create obvious brush strokes on your paint job. You can help the brush strokes disappear even more by using a soft trim brush that leaves smoother marks and mixing Floetrol into your paint to ensure a longer working time, meaning that your paint has more time to level and smooth before drying.

Want to spruce up your door hardware like mine here? Check out DIY Faux Antique Brass Finish for Hardware. For many more painting tips, check out my course DIY Renovation for Beginners, where I have an entire module on patching and painting.
